11.2. Contributing to the Manual
It is very easy to contribute to the existing manual. All you need is
to e-mail us the changes. However, if you like it is also easy to set
up the manual generation framework on your local machine as described
in a later section.
11.2.1. Organisation of the Manual in Git
The FG manual has been developed by many different groups and we try
to provide a consistant set of manual pages as much as possible. The
manual is located in the directory:
Here you will find the many RST files contributed by the team members.
To simplify editing and to keep the number of conflicts during
editing to a minimum it is naturally a good idea to have many such
files. However, all of them are integrated via the file:
into a single manual. Due to this organization it is also possible to
create custom manuals that may suport a particular class. For example
a class on big data may not be wanting to use MPI and thus a special
manual for such a class could be created. The nice thing is that the
teacher does not have to create additional information, but can just
use sphinx and a special index rst file to create a customized manual
of interest.
Please note that at this time we have also additional documented rst
files not yet included into the manual as they were not yet reviewed.
11.2.2. Online Editing for Novice Editors
If you are part of the FG manual development team you can edit the
manual pages online by going to:
https://github.com/futuregrid/manual/tree/master/docs/source
This will contain a directory with all the documents of the
manual. You can find the names of the documents by visiting the
manual, looking at the URL of the page that you would like to modify, openng up the corresponding rst page (e.g. replace the html with
rst). Dependent on your browser you can even configure it to open the
file in your favorite editor. Some plugins such as It’s All Text!
may be able to help.
Please consult with your browsers manual and available plugins.
However, a better solution may be to do the
changes in a clone locally and commit when ready. This is documented
in more detail in this section.
11.2.3. FAQ
- How to find the rst file?
- Sometimes an editor may want to locate the name of the rst
file. This is easy, just look in your browser, and see the url’s,
the last filename with a .html ending gives your the rst file name,
just replace html with rst
- Can I edit RST files in Word?
- yes you can, but you must make sure that you do use the proper
ascii characters for quotes and other symbols that RST relies on.
- Can I edit RST files directly in a Web browser without word
- Yes you can, you must have a git account for that and you can editd
directly?
- I do not have a Git account how do I communicate errors?
- Either Send us the url of the manual page with an error, copy the “before
text”, add a “changed to” text and e-mail it to us
- Or, create a git clone and send us the patch. More information
about this can be found in the git user manual on github.com
- Why use RST?
- Previously pages of the FG manual were edited directly in drupal
on our portal. However, editors were abusing our wysiwyg editor by
pasting and copying text from third party editors such as word
into the drupal editor. Unfortunately, this lead to inconsistent
formatting and severe problems by editing documents. We also
discovered issues at times when documents were edited by multiple
editors at the same time.
- While using RST we avoid inconsistent formatting.
- While using git we use a much better tracking feature for parallel
edits,
- While using RST we have a nice search feature.
- While using RST we can integrate auto-generate documentation form
FutureGrid code we develop such as RAIN and cloudmesh.
- Why not use Word and skydrive?
- Our team has rich experience with skydrive and Word. However word
does not provide a publication framework for our manual that is
maintained by a highly distributed team. Although skydrive can be
a help to share directories, we still have to enable the creation
of a single consistent manual. We also experienced issues with
large groups on microsoft skydrive. As most contributions come
from developers that have already accounts on github, they do not
have to create new accounts on skydrive. Furthermore, not all
developers have access to word. However RST documents are editor
independent. You can edit them with Word, emacs, vi, vim, or
whatever other text editor you like. Thus the good news is if you like to use word to edit the
documentation you can.
- I am having difficulties understanding this.How can I get help?
- Please contact Gregor von Laszewski at laszewski@gmail.com. He can
schedule an in person meeting in Bloomington, IN or a google
hangout meeting.
11.2.4. Publication of the Manual
The manual will be automatically updated once a day
Additionally you can e-mail laszewski@gmail.com for an update
request while describing which files have been changed so a review can
take place and the publication script can be invoked. We have not put
this script into the repository in order to avoid accidental changes.
11.3. Setting Up the Expert Developers Manual Editing Environment
Note that setting up the expert manual editing environment is optional
and does not have to be conducted at all in order to contribute or
allert us of errors in the manual. We suggest that you consult the
previous section for hints on how to send us errors or improvement
suggestions for the manual.
It is extremely easy to build the FG manual on your local
machine. Just a very limited number of python packages are
needed. However, we have decided to only document the way to install
it in pythons excellent virtualenv. Although it is possible to have an
even easier instal, we decided to stay with virtualenv as it will
protect your current environment from packeges that you may not want
to have on your computer in your regular python environment.
11.3.1. Python
Make sure you have python 2.7.2:
Please note that we have not tried python version 3 for this.
11.3.2. Virtualenv
Make sure the is no book directory in your home
Use virtual env:
$ cd ~
$ virtualenv MANUAL
$ source MANUAL/bin/activate
In case you were to use another terminal (for example quit this one
and start a new one later), please remember to execute:
$ source MANUAL/bin/activate
11.3.3. Create a github local directory with the manual
We assume you will install your local copy of the manual in
~/github/manual. If you do not want to use the github dir, please use
another directory name you like:
$ mkdir -p ~/github
$ cd ~/github
$ git clone https://github.com/futuregrid/manual.git
11.3.4. Install the Requirements
To build this book make sure you install the following module:
$ cd manual
$ pip install -r requirements.txt
This may take a while, so be patient.
The files will be in:
and have an rst ending. They use
restructured text. For more info on rst see:
A cheat sheet is available from
http://github.com/ralsina/rst-cheatsheet/raw/master/rst-cheatsheet.pdf
The cheatsheet is also available in our online documentation in the
Section RST CHEATSHEET.
11.3.5. All-in-one setup script
Execute the following script only with care. Maybe its best if you
copy one line at a time as documented earlier to avoid problems:
cd ~
virtualenv MANUAL
source MANUAL/bin/activate
mkdir -p ~/github
cd ~/github
git clone https://github.com/futuregrid/manual.git
cd manual
pip install -r requirements.txt
11.3.6. Watchdog
This tool is optional and can be skipped for those just doing a
regular install.
You may be interested in using watchdog when you are in the process of
editing a page. Upon chnage it will update the changed html output
into the browser. For example, assume you edit the page
openstack.rst. If you are running in another window:
make watchdog FILE=openstack
For more details, please see the Makefile.
11.3.7. Transfering a page from the portal to RST
Assume you like to transfer a page from the portal to rst. This can
actually be done quite easily using a program called pandoc. First get
the page and rename it to a page with html:
$ wget https://portal.futuregrid.org/contrib/simple-vine-tutorial
$ mv simple-vine-tutorial simple-vine-tutorial.html
$ pandoc simple-vine-tutorial.html -o simple-vine-tutorial.rst
Than edit the page and remove the code related to the menues so only
the bare code stays:
11.3.8. Creating the pages locally
To create the pages locally simply go in the manual folder and saay
make:
$ cd ~/github/manual
$ make
Your index file will be in:
$ firefox ./docs/build/html/index.html
On Osx you can simply say:
11.3.9. Publishing the pages
The pages can be published to github with:
11.3.12. Screencast recording tips
11.3.12.1. OSX
Install OmniDazzle from:
Hide the icons on OSX desktop:
$ defaults write com.apple.finder CreateDesktop -bool false
$ killall Finder
Show the icons on OSX desktop:
$ defaults write com.apple.finder CreateDesktop -bool true
$ killall Finder
11.3.12.2. Changing the prompt
To change the prompt you can do something like:
11.3.12.3. Recording of typed in commands
Simply use:
11.3.12.4. Setup quicktime sound recording
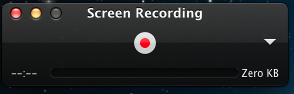
Start up quicktime you will see the following window:
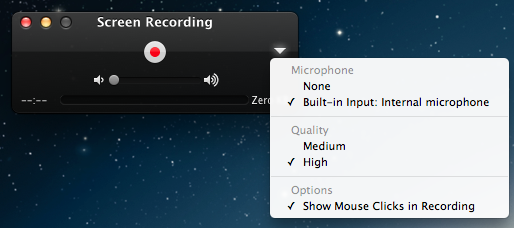
Click on the little arrow on the right and you will see
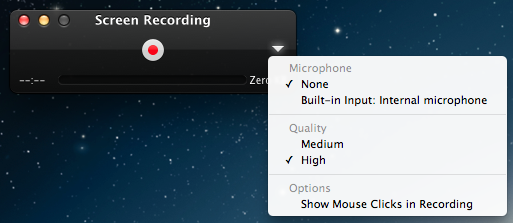
Checkon the microphone you like to activate. This is most likely the
Build-in-Input: Internal microphone. Also click on Show mouse click
in Recording:
Then start regording. Be careful that you wait in the rcordng till you
see a little timer on the left quicktime needs a bit of startup time
when recording sound and images.