|
|
FutureGrid Rain: Cloud/HPC Provisioning |
|
|
FutureGrid Rain: Cloud/HPC Provisioning |
FutureGrid Rain is a tool that will allow users to place customized environments like virtual clusters or IaaS frameworks onto resources. The process of raining goes beyond the services offered by existing scheduling tools due to its higher-level toolset targeting virtualized and non-virtualized resources. Rain will be able to move resources from one infrastructure to another and compare the execution of an experiment in the different supported infrastructures.
In order to support Rain we need a flexible image management framework. Thus, Rain includes the FutureGrid Image Management framework which defines the full life cycle of the images in FutureGrid. It involves the process of creating, customizing, storing, sharing and registering images for different FutureGrid environments.
This framework allows users to generate personalized abstract images by simply specifying a list of requirements such as OS, architecture, software, and libraries. These images are generic enough that through manipulations they can be adapted for several IaaS or HPC infrastructures with little effort by the users. It will support the management of images for Nimbus, Eucalyptus, OpenStack, OpenNebula, and bare-metal HPC infrastructures.
FutureGrid Rain is a tool that will allow users to place customized environments like virtual clusters or IaaS frameworks onto resources. The process of raining goes beyond the services offered by existing scheduling tools due to its higher-level toolset targeting virtualized and non-virtualized resources. Rain will be able to move resources from one infrastructure to another and compare the execution of an experiment in the different supported infrastructures.
In order to support Rain we need a flexible Image Management framework. Thus, Rain includes the FutureGrid Image Management framework which defines the full life cycle of the images in FutureGrid. It involves the process of creating, customizing, storing, sharing, and registering images for different FG environments. To this end, we have several components to support the different tasks involved. First, we have an Image Generation tool that creates and customizes images according to user requirements. The second component is the Image Repository, which is in charge of storing, cataloging and sharing images. The last component is an Image Registration tool, which prepares, uploads and registers images for specific environments, like HPC or cloud frameworks. It also decides if an image is secure enough to be registered or if it needs additional security tests.
Image Management provides the low-level software needed to achieve Dynamic Provisioning and Rain. Dynamic Provisioning is in charge of allocating machines with the requested image. The requested image must have been previously registered in the infrastructure. On the other hand, Rain will be our highest level component that will use Dynamic Provisioning and Image Management to provide custom environments that may or may not exist. Therefore, a Rain request may involve the creation, registration, and provision of one or more images in a set of machines.
Due to the variety of services and limited resources provided in FG, it is necessary to enable a mechanism to provision needed services onto resources. This includes also the assignment of resources to different IaaS or PaaS frameworks.
Rain makes it possible to compare the benefits of IaaS, PaaS performance issues, as well as evaluating which applications can benefit from such environments and how they must be efficiently configured. As part of this process, we allow the generation of abstract images and universal image registration with the various infrastructures including Nimbus, Eucalyptus, OpenNebula, OpenStack, but also bare-metal via the HPC services.
It is one of the unique features about FutureGrid to provide an essential component to make comparisons between the different infrastructures more easily possible. Rain will offers four main features:
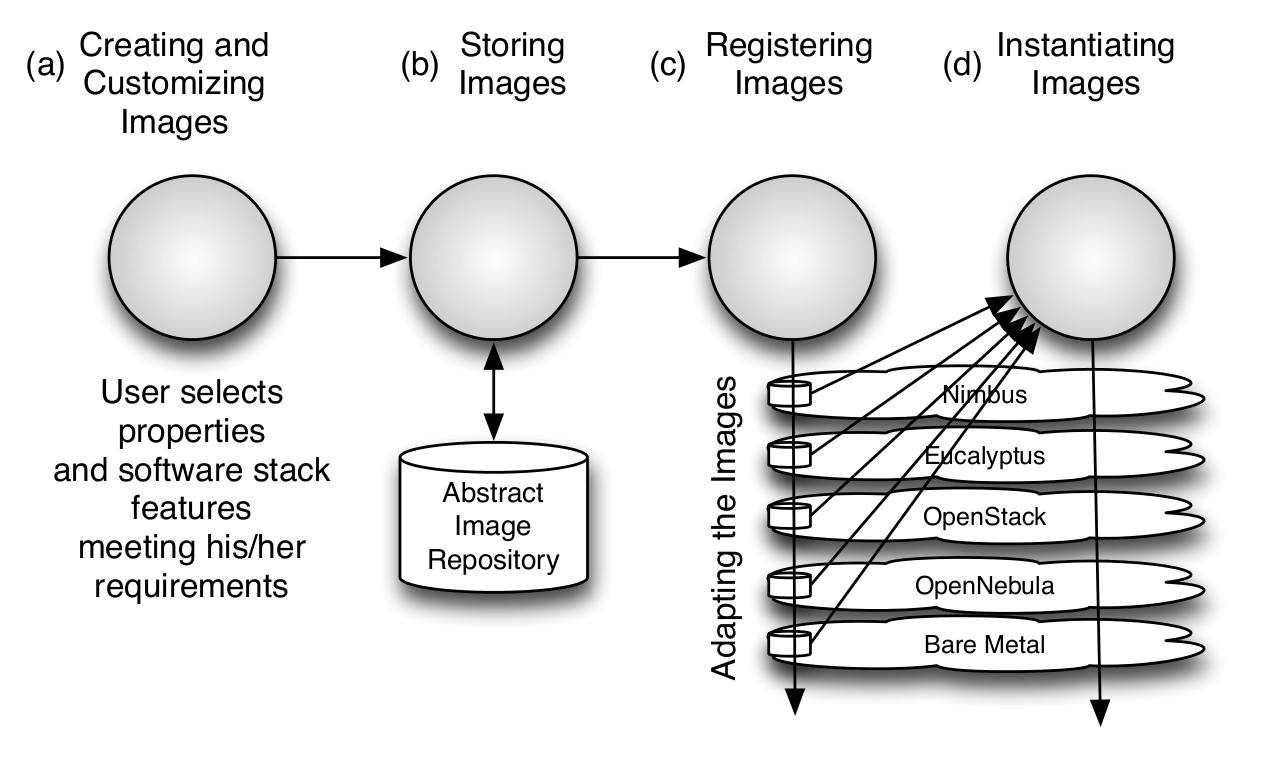
Image management is a key component in any modern compute infrastructure, regardless if used for virtualized or non-virtualized resources. We distinguish a number of important processes that are integral part of the life-cycle management of images. They include (a) image creation and customization, (b) sharing the images via a repository, (c) registering the image into the infrastructure, and (d) image instantiation. The problem of targeting not one, but multiple infrastructures amplifies the need for tools supporting these processes. Without them, only the most experienced users will be able to manage them under great investment of time.
The image generation provides the first step in our image management process allowing users to create images according to their specifications. Since FG is a testbed that support different type of infrastructures like HPC or IaaS, the images created by this tool are not aimed to any specific environment. Thus, it is at the registration time when the images are customized to be successfully integrated into the desired infrastructure. This clear separation between image generation and registration provides a powerful model that allow us to independently increase the OS and infrastructures supported, respectively. Moreover, it reduces the amount of images that we need to manage in the image repository and therefore the disk usage.
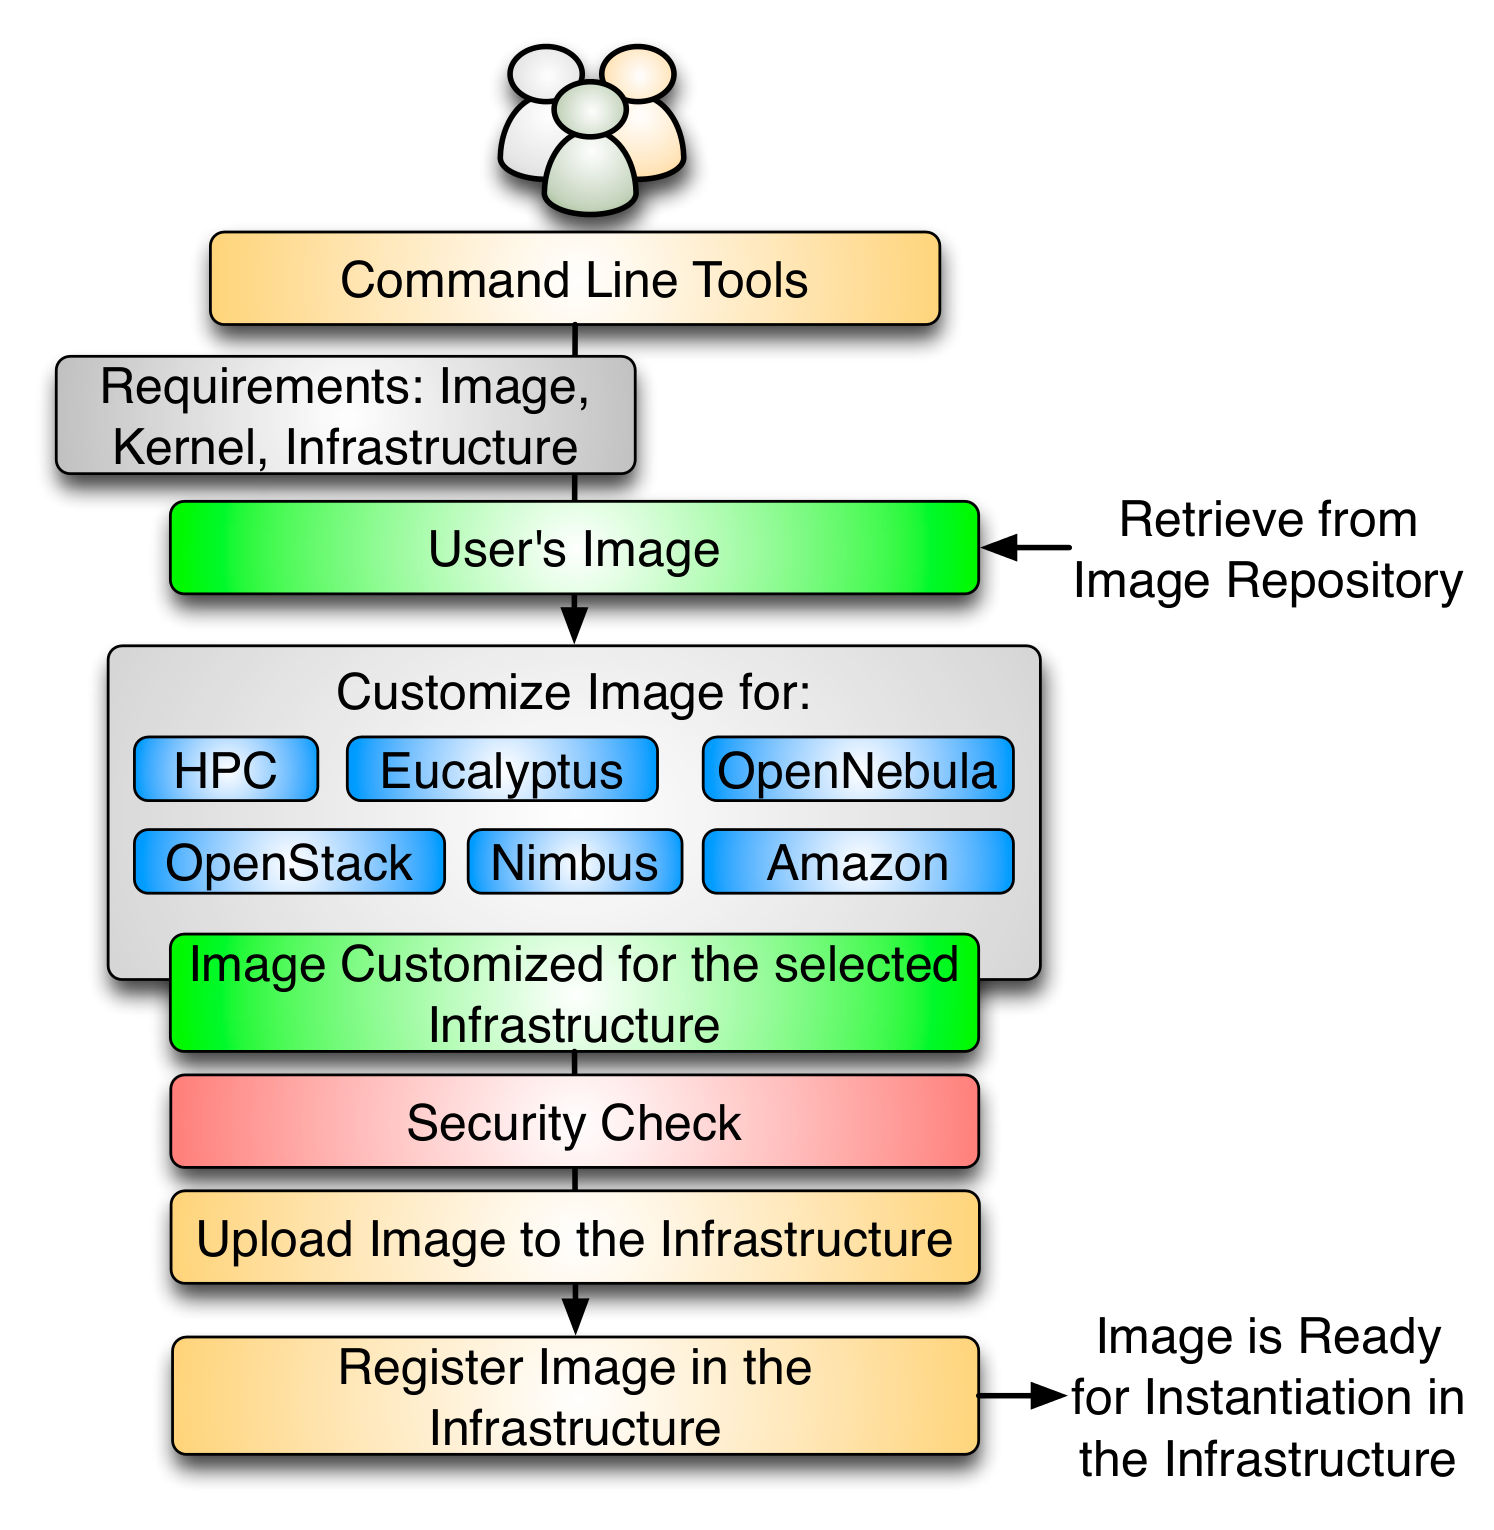
The flowchart depicted in the next figure shows the process followed to create an image.

Users initiate the process by specifying their requirements. These requirements can include the selection of the OS type, version, architecture, software, services, and more. First, the image generation tool searches into the image repository to identify a base image to be cloned, and if there is no good candidate, the base image is created from scratch. Once we have a base image, the image generation tool installs the software required by the user. This software must be in the official OS repositories or in the FG software repository. The later contains software developed by the FG team or other approved software. The installation procedure can be aided by Chef, a configuration management tool to ensure the software is installed and configured properly. After updating the image, it is stored in the image repository and becomes available for registration into one of the supported infrastructures. Our tool is general to deal with installation particularities of different operating systems and architectures.
The image repository catalogs and stores images in a unified repository. It offers a common interface for distinguishing image types for different IaaS frameworks but also bare-metal images. This allows us to include a diverse set of images contributed not only by the FG development team but also by the user community that generates such images and wishes to share them. The images are augmented with information about the software stack installed on them including versions, libraries, and available services. This information is maintained in the catalog and can be searched by users and/or other FG services. Users looking for a specific image can discover available images fitting their needs using the catalog interface.
The information associated to the images is stored using the fields collected in the next table.
Field Name Type Valid Values Description Access imgId String Unique identifier Read-Only owner String Image’s owner Read-Only os String Operating system Read-Write arch String Architecture of the Image Read-Write description String Description of the image Read-Write tag String list Image’s keywords Read-Write vmType String none, xen, kvm, virtualbox, vmware Virtual machine type imgType String machine, kernel, eucalyptus, nimbus, opennebula, openstack Aim of the image Read-Write permission String public, private Access permission to the image Read-Write imgStatus String available, locked Status of the image Read-Write createdDate Date Upload date Read-Only lastAccess Date Last time the image was accessed Read-Only accessCount Long # times the image has been accessed Read-Only size Long Size of the image Read-Only
Once the image has been created and stored into the repository, we need to register it into the targeted infrastructure before we can instantiate it. Users requirements are simply the image, the targeted infrastructure and the kernel. The kernel is an optional requirement that allows advance users to select the most appropriate kernel for their experiments. This tool provides a list of available kernels organized by infrastructure. Nevertheless, users may request support for other kernels like one customized by them. Registering an image also includes the process of adapting it for the infrastructure. Often we find differences between them requiring us to provide further customizations, security check, the upload of the image to the infrastructure repository, and registering it. The process of adaptation and registration is depicted in Figure 4 in more detail. These customizations include the configuration of network IP, DNS, file system table, and kernel modules. Additional configuration is performed depending on the targeted deployed infrastructure.
In the HPC infrastructure the images are converted to network bootable images to be provisioned on bare-metal machines. Here, the customization process configures the image, so it can be integrated into the pool of deployable images accessible by the scheduler. In our case this is Moab. Hence, if such an image is specified as part of the job description the scheduler will conduct the provisioning of the image for us. These images are stateless and the system is restored by reverting to a default OS once the running job requiring a customized image is completed.
Images targeted for cloud infrastructures need to be converted into VM disks. These images also need some additional configuration to enable VM’s contextualization in the selected cloud. Our plan is to support the main IaaS clouds, namely Eucalyptus, Nimbus, OpenStack, OpenNebula, and Amazon Web Service (AWS). As our tool is extensible, we can also support other cloud frameworks.
At this moment, our software only provides command line interfaces. Thus, users need access to the machine where the client part of the software is installed. Currently, this is installed and configured in the India cluster (india.futuregrid.org). Since our software is going to interact with different cloud infrastructures, users need to have the appropriated credentials for each case.
Once users have the appropriate accounts, they can login on India and use the module functionality to load the environment variables:
$ ssh <username>@india.futuregrid.org
$ module load futuregrid
Note
At this point, users have to explicitly request access to the Image Management and rain tools by sending a ticket to https://portal.futuregrid.org/help.
To ease the use of the FG tools, we have created a shell that provides a common interface for all these tools. So, users just need to remember how to execute the shell. Once users login into the shell, a number of features will be exposed to them. These features include help, command’s auto-completion, and list of available commands organized by tool. Moreover, users only need to type the password when they login into the shell.
Users can log into the shell by executing:
$ fg-shell -u <username>
Note
Users need to use their FutureGrid portal password.
More information about using the shell can be found in the FutureGrid Shell Manual.
The Image Repository is a service to query, store, and update images through a unique and common interface. Next, we show some examples of the Image Repository usage (fg-repo command). More details can be found in the Image Repository Manual.
Additionally, the Image Repository manages the user database for all the image management components. This database is used to authorize users, to control the user’s quotas and to record usage information. Therefore, this database complements the LDAP server which is mainly focused on the user authentication.
When using fg-shell, users need to load the Image Repository context by executing use repo inside the shell. The Image Repository environment is also included in the Image Management (image) and Rain (rain) contexts. Once there is an active context, the help command will show only the available commands for such context. Available contexts can be listed using the contexts command. More information about the shell can be found in the FutureGrid Shell Manual.
Upload an image
$ fg-repo -p /home/javi/image.iso "vmtype=kvm&os=Centos5&arch=i386&description=this is a test description&tag=tsttag1, tsttag2&permission=private" -u jdiaz
$ fg-repo -p /home/javi/image.iso "ImgType=Openstack&os=Ubuntu&arch=x86_64&description=this is a test description" -u jdiaz
put /home/javi/image.iso ImgType=Openstack&os=Ubuntu&arch=x86_64&description=this is a test description
Note
The & character is used to separate different metadata fields.
Get an image
$ fg-repo -g 964160263274803087640112 -u jdiaz
get 964160263274803087640112
Modify the metadata of an image
$ fg-repo -m 964160263274803087640112 "ImgType=Opennebula&os=Ubuntu10" -u jdiaz
modify 964160263274803087640112 ImgType=Opennebula&os=Ubuntu10
Query Image Repository
$ fg-repo -q "* where vmType=kvm" -u jdiaz
list * where vmType=kvm
Add user to the Image Repository
$ fg-repo --useradd juan -u jdiaz
$ fg-repo --usersetstatus juan active
user -a juan
user -m juan status active
This component creates images, according to user requirements, that can be registered in FutureGrid. Since FG is a testbed that supports different type of infrastructures like HPC or IaaS frameworks, the images created by this tool are not aimed at any specific environment. Thus, it is at registration time when the images are customized to be successfully integrated into the desired infrastructure.
Next, we provide some examples of the Image Generation usage (fg-generate command). More details can be found in the Image Generation Manual.
When using fg-shell, users need to load the Image Management context by executing use image inside the shell. The Image Management environment is also included in the Rain (rain) contexts. Once there is an active context, the help command will show only the available commands for such context. Available contexts can be listed using the contexts command. More information about the shell can be found in the FutureGrid Shell Manual.
Generate a CentOS image
$ fg-generate -o centos -v 5 -a x86_64 -s wget,emacs,python26 -u jdiaz
generate -o centos -v 5 -a x86_64 -s wget,emacs,python26
Generate an Ubuntu image
$ fg-generate -o ubuntu -v 10.10 -a x86_64 -s wget,openmpi-bin -u jdiaz
generate -o ubuntu -v 10.10 -a x86_64 -s wget,emacs,python26
This tool is responsible for customizing images for specific infrastructures and registering them in such infrastructures. Currently, we fully support HPC (bare-metal machines), Eucalyptus, OpenStack, and Nimbus infrastructures. OpenNebula is also implemented but we do not have this infrastructure in production yet.
Next, we provide some examples of the image registration usage (fg-register command). A detailed manual can be found in the Image Registration Manual
When using fg-shell, users need to load the Image Management context by executing use image inside the shell. The Image Management environment also loads the Image Repository context. The Image Management is also included in the Rain (rain) contexts. Once there is an active context, the help command will show only the available commands for such context. Available contexts can be listed using the contexts command. More information about the shell can be found in the FutureGrid Shell Manual.
Note
Register an image for the HPC Infrastructure India
$ fg-register -r 964160263274803087640112 -x india -u jdiaz
register -r 964160263274803087640112 -x india
Register an image for OpenStack (if you followed the FG Openstack tutorial, your novarc will probably be in ~/openstack/novarc)
$ fg-register -r 964160263274803087640112 -s india -v ~/novarc -u jdiaz
register -r 964160263274803087640112 -s india -v ~/novarc
Customize an image for Ecualyptus but do not register it (here -v ~/eucarc is not needed because we are not going to register the image in the infrastructure)
$ fg-register -r 964160263274803087640112 -e india -g -u jdiaz
register -r 964160263274803087640112 -e india -g
Register an image for Nimbus
$ fg-register -r 964160263274803087640112 -n hotel -v ~/hotel.conf -u jdiaz
register -r 964160263274803087640112 -n hotel -v ~/hotel.conf
List available kernels for the HPC infrastructure India
fg-register --listkernels -x india -u jdiaz
hpclistkernels india
List available kernels for OpenStack
fg-register --listkernels -s india -u jdiaz
cloudlistkernels -s india
Deregister an image from OpenStack (if you followed the FG Openstack tutorial, your novarc will probably be in ~/openstack/novarc)
fg-register --deregister ami-00000126 -s india -v ~/novarc -u jdiaz
deregister --deregister ami-00000126 -s india -v ~/novarc
Deregister an image from HPC (user role must be admin)
fg-register --deregister centosjdiaz1610805121 -x india -u jdiaz
deregister --deregister centosjdiaz1610805121 -x india
List Information of the available sites
fg-register --listsites -u jdiaz
listsites
The output would be something like
Supported Sites Information
===========================

Cloud Information
-----------------
SiteName: sierra
  Description: In this site we support Eucalyptus 3.
  Infrastructures supported: ['Eucalyptus']
SiteName: hotel
  Description: In this site we support Nimbus 2.9.
  Infrastructures supported: ['Nimbus']
SiteName: india
  Description: In this site we support Eucalyptus 2 and OpenStack Cactus. OpenNebula is not deployed in production but you can adapt images for it too.
  Infrastructures supported: ['Eucalyptus', 'OpenStack', 'OpenNebula']

HPC Information (baremetal)
---------------------------
SiteName: india
  RegisterXcat Service Status: Active
  RegisterMoab Service Status: Active
This component allow users to dynamically register FutureGrid software environments as requirement of a job submission. This component will make use of the previous registration tool. Currently we only support HPC job submissions.
Next, we provide some examples of the Rain usage (fg-rain command). A detailed manual can be found in the Rain Manual.
When using fg-shell, users need to load the Image Management context by executing use rain inside the shell. The Rain environment also loads the Image Repository and Image Management contexts. Once there is an active context, the help command will show only the available commands for such context. Available contexts can be listed using the contexts command. More information about the shell can be found in the FutureGrid Shell Manual.
Note
Run a job in four nodes on India using an image stored in the Image Repository (This involves the registration of the image in the HPC infrastructure)
$ fg-rain -r 1231232141 -x india -m 4 -j myscript.sh -u jdiaz
use rain    #if your prompt is different to fg-rain>
fg-rain> launch -r 1231232141 -x india -m 4 -j myscript.sh
Run a job in two nodes on India using an image already registered in the HPC Infrastructure India
$ fg-rain -i centosjavi434512 -x india -m 2 -j myscript.sh -u jdiaz
use rain    #if your prompt is different to fg-rain>
fg-rain> launch -i centosjavi434512 -x india -m 2 -j myscript.sh
Interactive mode. Instantiate two VMs using an image already registered on OpenStack
$ fg-rain -i ami-00000126 -s india -v ~/novarc -m 2 -I -u jdiaz
use rain    #if your prompt is different to fg-rain>
fg-rain> launch -i ami-00000126 -s india -v ~/novarc -m 2 -I
Run an MPI job in six VM using an image already registered on Eucalyptus (the image has to have the mpich2 package installed)
Content of mpichjob.sh:
#!/bin/bash

#real home is /tmp/jdiaz/
#VM home is /N/u/jdiaz/
#$HOME/machines is a file with the VMs involved in this job

cd /tmp/N/u/jdiaz/mpichexample/

mpiexec.hydra -machinefile /N/u/jdiaz/machines -np `wc -l /N/u/jdiaz/machines |  cut -d" " -f1` /tmp/N/u/jdiaz/example/a.out > /tmp/N/u/jdiaz/output.mpichexample
$ fg-rain -i ami-00000126 -e india -v ~/eucarc -j mpichjob.sh -m 6 -u jdiaz
use rain    #if your prompt is different to fg-rain>
fg-rain> launch -i ami-00000126 -e india -v ~/eucarc -j mpichjob.sh -m 6
Run Hadoop job on three VMs using an image already registered on OpenStack (the image has to have java package installed. Hadoop is automatically installed/configured by the tool.)
- For this example, the inputdir1 directory contains ebooks from the Project Gutenberg downloaded in Plain Text UTF-8 encoding:
Content of hadoopword.sh:
hadoop jar $HADOOP_CONF_DIR/../hadoop-examples*.jar wordcount inputdir1 outputdir
- Using the CLI
$ fg-rain -i ami-000001bf -s india -v ~/novarc -j ~/hadoopword.sh -m 3 --inputdir ~/inputdir1/ --outputdir ~/outputdir -u jdiaz
use rain    #if your prompt is different to fg-rain>
fg-rain> launchadoop -i ami-000001bf -s india -v ~/novarc -j ~/hadoopword.sh -m 3 --inputdir ~/inputdir1/ --outputdir ~/outputdir
Interactive mode. Setup a Hadoop cluster in three VMs using an image already registered on OpenStack (the image has to have java package installed. Hadoop is automatically installed/configured by the tool.)
- For this example, the inputdir1 directory contains ebooks from the Project Gutenberg downloaded in Plain Text UTF-8 encoding:
Content of hadoopword.sh:
hadoop jar $HADOOP_CONF_DIR/../hadoop-examples*.jar wordcount inputdir1 outputdir
- Using the CLI
$ fg-rain -i ami-000001bf -s india -v ~/novarc -I -m 3 --inputdir ~/inputdir1/ --outputdir ~/outputdir -u jdiaz
use rain    #if your prompt is different to fg-rain>
fg-rain> launchadoop -i ami-000001bf -s india -v ~/novarc -I -m 3 --inputdir ~/inputdir1/ --outputdir ~/outputdir
Run Hadoop job three machines using an image already registered on the HPC infrastructure (the image has to have java package installed. Hadoop is automatically installed/configured by the tool.)
- For this example, the inputdir1 directory contains ebooks from the Project Gutenberg downloaded in Plain Text UTF-8 encoding:
Content of hadoopword.sh:
hadoop jar $HADOOP_CONF_DIR/../hadoop-examples*.jar wordcount inputdir1 outputdir
- Using the CLI
$ fg-rain -x india -j ~/hadoopword.sh -m 3 --inputdir ~/inputdir1/ --outputdir ~/outputdir --walltime 1 -u jdiaz
use rain    #if your prompt is different to fg-rain>
fg-rain> launchadoop -x india -j ~/hadoopword.sh -m 3 --inputdir ~/inputdir1/ --outputdir ~/outputdir --walltime 1
In this section you will find information on how to use the command line interfaces of our tools.
The Image Repository is a service to query, store, and update images through a unique and common interface.
usage: fg-repo [-h] -u user [-d]
               (-q [AttributeString] | -g imgId | -p imgFile [AttributeString ...] | -m imgId AttributeString
                 | -r imgId [imgId ...] | -s imgId permissionString | --useradd userId | --userdel userId
                 | --userlist | --setuserquota userId quotaExpresion | --setuserrole userId role | --setuserstatus userId status
                 | --histimg [imgId] | --histuser [userId])
               [--nopasswd]

Options between brackets are not required. Parenthesis means that you need to specify one of the options.
| Option | Description |
| -h/--help | Shows help information and exit. |
| -u/--user <userName> | FutureGrid HPC user name, that is, the one used to login into the FG resources. |
| -q/--list [queryString] | Get list of images that meet the criteria. |
| -g/--get <imgId> | Get an image by specifying its unique identifier. |
| -p/--put <imgFile> [attributeString] | Store image into the repository and its metadata defined in attributeString. Default metadata is provided if the argument is missing. |
| -m/--modify <imgId> <attributeString> | Modify the metadata associated with the image. |
| -r/--remove <imgId> [imgId ...] | Delete images from the Repository. |
| -s/--setpermission <imgId> <permissionString> | Change the permission of a particular image. Valid values are public, private. |
| --histimg [imgId] | Get usage information an image. If no argument provided, it shows the usage information of all images. |
| --nopasswd | If this option is used, the password is not requested. This is intended for systems daemons like Inca. |
The following options are available only for users with admin role.
| Option | Description |
| --useradd <userId> | Add a new user to the image management database. |
| --userdel <userId> | Delete an user from the image management database. |
| --userlist | List of users. |
| --setuserquota <userId> <quota> | Modify the quota of a user. The quota is given in bytes, but math expressions are allowed (4*1024*1024). By default each user has 4GB of disk space. |
| --setuserrole <userId> <role> | Modify the role of a user. Valid values: admin and user roles. |
| --setuserstatus <userId> <status> | Modify the status of a user. Valid values: pending, active, and inactive. |
| --histuser [userId] | Get usage info of an User. If no argument provided, it shows the usage information of all users. This option can be used by normal users to show their own information |
Note
While using the command line interface, the attributeString, queryString and quotaExpression arguments must be enclosed by “ characters.
Upload an image
$ fg-repo -p /home/javi/image.iso "vmtype=kvm&os=Centos5&arch=i386&description=this is a test description&tag=tsttag1, tsttag2&permission=private" -u jdiaz
$ fg-repo -p /home/javi/image.iso "ImgType=Openstack&os=Ubuntu&arch=x86_64&description=this is a test description" -u jdiaz
Note
The & character is used to separate different metadata fields.
Get an image
$ fg-repo -g 964160263274803087640112 -u jdiaz
Modify the metadata of an image
$ fg-repo -m 964160263274803087640112 "ImgType=Opennebula&os=Ubuntu10" -u jdiaz
Query Image Repository
$ fg-repo -q "* where vmType=kvm" -u jdiaz
Add user to the Image Repository
$ fg-repo --useradd juan -u jdiaz
$ fg-repo --usersetstatus juan active
This service generates images with the requested OS and software stacks specification.
usage: fg-generate [-h] -u USER [-d] -o OSName [-v OSversion] [-a arch]
                   [--baseimage | -s software] [--scratch] [-n givenname]
                   [-e description] [-g] [-z SIZE] [--nopasswd]

Options between brackets are not required. Parenthesis means that you need to specify one of the options.
| Option | Description |
| -h/--help | Shows help information and exit. |
| -u/--user <userName> | FutureGrid HPC user name, that is, the one used to login into the FG resources. |
| -o/--os <osName> | Specify the desired Operating System for the new image. Currently, CentOS and Ubuntu are supported |
| -v/--version <osVersion> | Operating System version. In the case of Centos, it can be 5 or 6. In the case of Ubuntu, it can be karmic(9.10), lucid(10.04), maverick(10.10), natty (11.04) |
| -a/--arch <arch> | Destination hardware architecture (x86_64 or i386) |
| --baseimage | Generate a Base Image that will be used to generate other images. In this way, the image generation process will be faster. |
| -s/--software <software> | List of software packages, separated by commas, that will be installed in the image. |
| --scratch | Generate the image from scratch without using any Base Image from the repository. |
| -n/--name <givenname> | Desired recognizable name of the image. |
| -e/--description <description> | Short description of the image and its purpose. |
| -g/--getimg | Retrieve the image instead of uploading to the image repository. |
| -z/--size <SIZE> | Specify the size of the Image in GigaBytes. The size must be large enough to install all the software required. The default and minimum size is 1.5GB, which is enough for most cases. |
| --nopasswd | If this option is used, the password is not requested. This is intended for systems daemons like Inca. |
Generate a CentOS image
$ fg-generate -o centos -v 5 -a x86_64 -s wget,emacs,python26 -u jdiaz
Generate an Ubuntu image
$ fg-generate -o ubuntu -v 10.10 -a x86_64 -s wget,openmpi-bin -u jdiaz
This service registers images in the selected infrastructures. After this process, images become available for instantiation in such infrastructures.
usage: fg-register [-h] -u user [-d] (-i ImgFile | -r ImgId | --list | --listkernels | --listsites | --deregister ImgId)
                   [-k Kernel version] [-a ramdiskId]
                   (-x SiteName | -e SiteName | -o SiteName | -n SiteName | -s SiteName)
                   [-v VARFILE] [--getimg] [--noldap] [--wait] [--nopasswd] [--justregister]

Options between brackets are not required. Parenthesis means that you need to specify one of the options.
| Option | Description |
| -h/--help | Shows help information and exit. |
| -u/--user <userName> | FutureGrid HPC user name, that is, the one used to login into the FG resources. |
| -i/--image <imgFile> | Select the image to register by specifying its location. The image is a tgz file that contains the manifest and image files. |
| -r/--imgid <imgId> | Select the image to register by specifying its Id in the repository. |
| -k/--kernel <version> | Specify the desired kernel. Case a) if the image has to be adapted (any image generated with fg-generate) this option can be used to select one of the available kernels. Both kernelId and ramdiskId will be selected according to the selected kernel. This case is for any infrastructure. Case b) if the image is ready to be registered, you may need to specify the id of the kernel in the infrastructure. This case is when -j/--justregister is used and only for cloud infrastructures. |
| -a/--ramdisk <ramdiskId> | Specify the desired ramdisk that will be associated to your image in the cloud infrastructure. This option is only needed if -j/--justregister is used. |
| -l/--list | List images registered in the HPC or Cloud infrastructures. |
| -t/--listkernels | List kernels available for HPC or Cloud infrastructures. |
| --listsites | List supported sites with their respective HPC and Cloud services. |
| --deregister <imgId> | Deregister an image from the specified infrastructure. |
| -x/--xcat <SiteName> | Select the HPC infrastructure named SiteName (minicluster, india ...). |
| -e/--euca <SiteName> | Select the Eucalyptus Infrastructure located in SiteName (india, sierra...). |
| -s/--openstack <SiteName> | Select the OpenStack Infrastructure located in SiteName (india, sierra...). |
| -n/--nimbus <SiteName> | Select the Nimbus Infrastructure located in SiteName (india, sierra...). |
| -o/--opennebula <SiteName> | Select the OpenNebula Infrastructure located in SiteName (india, sierra...). |
| -v/--varfile <VARFILE> | Path of the environment variable files. Currently this is used by Eucalyptus, OpenStack and Nimbus. |
| -g/--getimg | Customize the image for a particular cloud framework but does not register it. So the user gets the image file. |
| -p/--noldap | If this option is active, FutureGrid LDAP will not be configured in the image. This option only works for Cloud registrations. LDAP configuration is needed to run jobs using fg-rain |
| -w/--wait | Wait until the image is available in the targeted infrastructure. Currently this is used by Eucalyptus and OpenStack. |
| --nopasswd | If this option is used, the password is not requested. This is intended for systems daemons like Inca. |
| -j, --justregister | It assumes that the image is ready to run in the selected infrastructure. Thus, no additional configuration will be performed. Only valid for Cloud infrastructures. (This is basically a wrapper of the tools that register images into the cloud infrastructures) |
Note
Register an image for the HPC Infrastructure India
$ fg-register -r 964160263274803087640112 -x india -u jdiaz
Register an image for OpenStack
$ fg-register -r 964160263274803087640112 -s india -v ~/novarc -u jdiaz
Customize an image for Ecualyptus but do not register it (here -v ~/eucarc is not needed because we are not going to register the image in the infrastructure)
$ fg-register -r 964160263274803087640112 -e sierra -g -u jdiaz
Register an image for Nimbus
$ fg-register -r 964160263274803087640112 -n hotel -v ~/hotel.conf -u jdiaz
List available kernels for the HPC infrastructure India
fg-register --listkernels -x india -u jdiaz
List available kernels for OpenStack
fg-register --listkernels -s india -u jdiaz
Deregister an image from OpenStack
fg-register --deregister ami-00000126 -s india -v ~/novarc -u jdiaz
Deregister an image from HPC (user role must be admin)
fg-register --deregister centosjdiaz1610805121 -x india -u jdiaz
List Information of the available sites
fg-register --listsites -u jdiaz
The output would be something like
Supported Sites Information
===========================

Cloud Information
-----------------
SiteName: sierra
  Description: In this site we support Eucalyptus 3.
  Infrastructures supported: ['Eucalyptus']
SiteName: hotel
  Description: In this site we support Nimbus 2.9.
  Infrastructures supported: ['Nimbus']
SiteName: india
  Description: In this site we support Eucalyptus 2 and OpenStack Cactus. OpenNebula is not deployed in production but you can adapt images for it too.
  Infrastructures supported: ['Eucalyptus', 'OpenStack', 'OpenNebula']

HPC Information (baremetal)
---------------------------
SiteName: india
  RegisterXcat Service Status: Active
  RegisterMoab Service Status: Active
Rain is a service that a command to dynamically deploy a FutureGrid software environments and stacks.
usage: fg-rain [-h] -u user [-d] [-k Kernel version]
               (-i ImgId | -r ImgId) (-x MachineName | -e [Address:port] | -s [Address])
               [-v VARFILE] [-t <instancetype>] [--volume <size>] [-m #instances] [-w hours]
               (-j JOBSCRIPT | -I | -b) [--nopasswd]
               [--hadoop] [--inputdir INPUTDIR] [--outputdir OUTPUTDIR] [--hdfsdir HDFSDIR]

Options between brackets are not required. Parenthesis means that you need to specify one of the options.
| Option | Description | |
| -h/--help | Shows help information and exit. | |
| -u/--user <userName> | FutureGrid HPC user name, that is, the one used to login into the FG resources. | |
| -k/--kernel <version> | Specify the desired kernel (fg-register can list the available kernels for each infrastructure). | |
| -i/--registeredimageid <imgId> | Select the image to use by specifying its Id in the target infrastructure. This assumes that the image is registered in the selected infrastructure. | |
| -r/--imgid <imgId> | Select the image to use by specifying its Id in the repository. The image will be automatically registered in the infrastructure before the job is executed. | |
| -x/--xcat <MachineName> | Use the HPC infrastructure named MachineName (minicluster, india ...). | |
| -e/--euca [Address:port] | Use the Eucalyptus Infrastructure, which is specified in the argument. The argument should not be needed. | |
| -s/--openstack [Address] | Use the OpenStack Infrastructure, which is specified in the argument. The argument should not be needed. | |
| -n/--nimbus [Address] | (NOT yet supported) Use the Nimbus Infrastructure, which is specified in the argument. The argument should not be needed. | |
| -o/--opennebula [Address] | (NOT yet supported) Use the OpenStack Infrastructure, which is specified in the argument. The argument should not be needed. | |
| -v/--varfile <VARFILE> | Path of the environment variable files. Currently this is used by Eucalyptus, OpenStack and Nimbus. | |
| -m/--numberofmachines <#instances> | Number of machines needed. | |
| --volume <size> | This creates and attaches a volume of the specified size (in GiB) to each instance. The volume will be mounted in /mnt/. This is supported by Eucalyptus and OpenStack. | |
| -t/--instance-type <instancetype> | VM Image type to run the instance as. Valid values: [‘m1.small’, ‘m1.large’, ‘m1.xlarge’] | |
| -w/--walltime <hours> | How long to run (in hours). You may use decimals. This is used for HPC and Nimbus. | |
| -j/--jobscript <JOBSCRIPT> | Script to execute on the provisioned images. In the case of Cloud environments, the user home directory is mounted in /tmp/N/u/<username>. The /N/u/<username> is only used for ssh between VM and store the ips of the parallel job in a file called /N/u/<username>/machines | |
| -I/--interactive | Interactive mode. It boots VMs or provisions bare-metal machines. Then, the user is automatically logged into one of the VMs/machines. | |
| -b, --background | Background mode. It boots VMs or provisions bare-metal machines. Then, it gives you the information you need to know to log in anytime. | |
| --nopasswd | If this option is used, the password is not requested. This is intended for systems daemons like Inca. | |
| Hadoop Option | Additional options to run hadoop jobs or go interactive into a hadoop cluster | |
| --hadoop | Specify that your want to execute a Hadoop job. Rain will setup a hadoop cluster in the selected infrastructure. It assumes that Java is installed in the image/machine. | |
| --inputdir <inputdir> | Location of the directory containing the job input data that has to be copied to HDFS. The HDFS directory will have the same name. Thus, if this option is used, the job script has to specify the name of the directory (not to all the path). | |
| --outputdir <outputdir> | Location of the directory to store the job output data from HDFS. The HDFS directory will have the same name. Thus, if this option is used, the job script has to specify the name of the directory (not to all the path). | |
| --hdfsdir <hdfsdir> | Location of the HDFS directory to use in the machines. If not provided /tmp/ will be used. |
Run a job in four nodes using an image stored in the Image Repository (This involves the registration of the image on xCAT/Moab)
$ fg-rain -r 1231232141 -x india -m 4 -j myscript.sh -u jdiaz
Run a job in four nodes using an image already registered on the HPC infrastructure (xCAT/Moab)
$ fg-rain -i centosjavi434512 -x india -m 2 -j myscript.sh -u jdiaz
Interactive mode. Instantiate two VMs using an image already registered on OpenStack
$ fg-rain -i ami-00000126 -s -v ~/novarc -m 2 -I -u jdiaz
Run a job in a VM using an image already registered on Eucalyptus
$ fg-rain -i ami-00000126 -e -v ~/eucarc -j myscript.sh -u jdiaz
Run an MPI job in six VM using an image already registered on Eucalyptus (the image has to have the mpich2 package installed)
$ fg-rain -i ami-00000126 -e -v ~/eucarc -j mpichjob.sh -m 6 -u jdiaz
Content of mpichjob.sh:
#!/bin/bash

#real home is /tmp/jdiaz/
#VM home is /N/u/jdiaz/
#$HOME/machines is a file with the VMs involved in this job

cd /tmp/N/u/jdiaz/mpichexample/

mpiexec.hydra -machinefile /N/u/jdiaz/machines -np `wc -l /N/u/jdiaz/machines |  cut -d" " -f1` /tmp/N/u/jdiaz/example/a.out > /tmp/N/u/jdiaz/output.mpichexample
Run Hadoop job on three VMs using an image already registered on OpenStack (the image has to have java package installed. Hadoop is automatically installed/configured by the tool.)
$ fg-rain -i ami-000001bf -s -v ~/novarc -j ~/hadoopword.sh -m 3 --inputdir ~/inputdir1/ --outputdir ~/outputdir -u jdiaz
- For this example, the inputdir1 directory contains ebooks from the Project Gutenberg downloaded in Plain Text UTF-8 encoding:
Content of hadoopword.sh:
hadoop jar $HADOOP_CONF_DIR/../hadoop-examples*.jar wordcount inputdir1 outputdir
Interactive mode. Setup a Hadoop cluster in three VMs using an image already registered on OpenStack (the image has to have java package installed. Hadoop is automatically installed/configured by the tool.)
$ fg-rain -i ami-000001bf -s -v ~/novarc -I -m 3 --inputdir ~/inputdir1/ --outputdir ~/outputdir -u jdiaz
- For this example, the inputdir1 directory contains ebooks from the Project Gutenberg downloaded in Plain Text UTF-8 encoding:
Content of hadoopword.sh:
hadoop jar $HADOOP_CONF_DIR/../hadoop-examples*.jar wordcount inputdir1 outputdir
Run Hadoop job three machines using an image already registered on the HPC infrastructure (the image has to have java package installed. Hadoop is automatically installed/configured by the tool.)
$ fg-rain -x india -j ~/hadoopword.sh -m 3 --inputdir ~/inputdir1/ --outputdir ~/outputdir --walltime 1 -u jdiaz
- For this example, the inputdir1 directory contains ebooks from the Project Gutenberg downloaded in Plain Text UTF-8 encoding:
Content of hadoopword.sh:
hadoop jar $HADOOP_CONF_DIR/../hadoop-examples*.jar wordcount inputdir1 outputdir
The FutureGrid shell simplifies the access to the different FutureGrid software components. This shell is a common entry point for every components that offer a customized environment where only the FutureGrid commands are available. It has features similar to the regular GNU/Linux shell like command auto-completion.
usage: fg-shell [-h] -u user [-q] [-i] [-f script_file] [--nopasswd]

Options between brackets are not required. Parenthesis means that you need to specify one of the options.
| Option | Description |
| -h/--help | Shows help information and exit. |
| -u/--user <userName> | FutureGrid HPC user name, that is, the one used to login into the FG resources. |
| -q/--quiet | Prevent to load banner and welcome messages |
| -i/--interactive | After the commands are interpreted the shell is put into interactive mode |
| -f/--file <script_file> | Execute commands from a file. |
| --nopasswd | If this option is used, the password is not requested. This is intended for systems daemons like Inca. |
The shell is executed by typing:
fg-shell -u <username>
After executing the previous command and typing your password, the prompt should change to fg>.
Note
Using shell from outside FutureGrid: If the shell is installed outside of FutureGrid, users will not be able to enter in the shell using their passwords. The security reasons, the LDAP server cannot be contacted from outside of FutureGrid. Therefore, users will have to use the option --nopasswd and set their password inside the shell by executing the command setpasswd. In this way, users can authenticate against the different FutureGrid components without typing the password everytime.
This is useful when a user install the shell in his local machine because he will not be able to enter in the shell typing his password.
Note
Context concept: It is essential to understand how to use the shell the concept CONTEXT. A context is an environment specialized for a particular tool or service. This allows us to use only the components we are interested on and organize the commands by component. For example, if we want to use the image repository, we initialize its context by typing use repo and only the image repository commands will be available. See contexts and use commands.
Next, we explain the available commands that you can find inside the FutureGrid Shell.
Commands listed in this section are available in any context.
Help Related Commands
Command
Description
help [command]
Show help message for a command or List of all available commands organized by context if we are in the generic context fg> (see use and context commands). However, if we are in a specific context (e.g. fg-repo>) it only show the generic commands and the specific commands of this particular context.
manual
List help message for all commands in the shell.
shortcuts
List all available shortcuts.
CONTEXT Related Commands
Command
Description
contexts
List of available contexts.
use [context]
Change the Shell CONTEXT to use a specified FG component. If no argument is provided, it returns to the default context.
History Related Commands
Command
Description
history, hist and hi
Show historic of executed commands.
historysession, hists and his
Show historic of the commands executed in the current session.
l, li
List last executed command.
save [N]
Save session history to a file. N => number of command (from historysession), or *. Most recent command if omitted.
Execution Related Commands
Command
Description
load <filename> and exec <filename>
Load commands from an script and stay in the shell
pause [text]
Displays the specified text then waits for the user to press RETURN.
py [command]
py <command>: Executes a Python command. py: Enters interactive Python mode. End with Ctrl-D (Unix) / Ctrl-Z (Windows), quit(), exit().
run, r
Re-run the last executed command
script [filename]
When Script is active, all commands executed are stored in a file. Activate it by executing: script [file]. If no argument is provided, the file will be called script and will be located in your current directory. To finish and store the commands execute: script end
User-Settable Parameters Related Commands
Command
Description
setpassword
Set the password for the current session without leaving the shell. The password is stored encrypted
set [parameter] [value]
Sets a cmd2 parameter. Call without arguments for a list of settable parameters with their values.
show
List of settable parameters with their values.
These commands are available when Image Repository (repo) or Image Management (image) contexts are active. To activate the image repository context execute use repo. If we execute help, we will see which commands are generic and which ones are specific of this context.
Image Related Commands
Command
Description
list [queryString]
Get list of images that meet the criteria.
get <imgId>
Get an image by specifying its unique identifier.
put <imgFile> [attributeString]
Store image into the repository and its metadata defined in attributeString. Default metadata is provided if the argument is missing.
modify <imgId> <attributeString>
Modify the metadata associated with the image.
remove <imgId>
Delete images from the Repository.
setpermission <imgId> <permissionString>
Change the permission of a particular image. Valid values are public, private.
histimg [imgId]
Get usage information an image. If no argument provided, it shows the usage information of all images.
User Related Commands
The following options are available only for users with admin role.
Command
Description
user <options>
Manage image management user’s database.
options
-a/--add <userId> Add a new user to the image management database.
-d/--del <userId> Delete an user from the image management database.
-l, --list List of users.
-m/--modify <userId> <quota/role/status> <value> Modify quota, role or status of an user.
histuser [userId]
Get usage info of an User. If no argument provided, it shows the usage information of all users. This option can be used by normal users to show their own information
These commands are available when the Image Management (image) or the Rain (rain) contexts are active. To activate the image management context execute use image. If we execute help, we will see which commands are generic and which ones are specific of this context.
| Command | Description |
| generate <options> | Generates images with the requested OS and software stacks specification. options -o/--os <osName> Specify the desired Operating System for the new image. Currently, CentOS and Ubuntu are supported -v/--version <osVersion> Operating System version. In the case of Centos, it can be 5 or 6. In the case of Ubuntu, it can be karmic(9.10), lucid(10.04), maverick(10.10), natty(11.04) -a/--arch <arch> Destination hardware architecture (x86_64 or i386) --baseimage Generate a Base Image that will be used to generate other images. In this way, the image generation process will be faster. -s/--software <software> List of software packages, separated by commas, that will be installed in the image. --scratch Generate the image from scratch without using any Base Image from the repository. -n/--name <givenname> Desired recognizable name of the image. -e/--description <description> Short description of the image and its purpose. -g/--getimg Retrieve the image instead of uploading to the image repository. -z/--size <SIZE> Specify the size of the Image in GigaBytes. The size must be large enough to install all the software required. The default and minimum size is 1.5GB, which is enough for most cases. |
These commands are available when the Image Management (image) or the Rain (rain) contexts are active. To activate the image management context execute use image. If we execute help, we will see which commands are generic and which ones are specific of this context.
| Command | Description |
| register <options> | Registers images in the selected infrastructures. After this process, images become available for instantiation in such infrastructures. Options -k/--kernel <version> Specify the desired kernel. -i/--image <imgFile> Select the image to register by specifying its location. The image is a tgz file that contains the manifest and image files. -r/--imgid <imgId> Select the image to register by specifying its Id in the repository. -x/--xcat <SiteName> Select the HPC infrastructure named SiteName (minicluster, india ...). -e/--euca <SiteName> Select the Eucalyptus Infrastructure located in SiteName (india, sierra...). -s/--openstack <SiteName> Select the OpenStack Infrastructure located in SiteName (india, sierra...). -n/--nimbus <SiteName> Select the Nimbus Infrastructure located in SiteName (india, sierra...). -o/--opennebula <SiteName> Select the OpenNebula Infrastructure located in SiteName (india, sierra...). -v/--varfile <VARFILE> Path of the environment variable files. Currently this is used by Eucalyptus, OpenStack and Nimbus. -g/--getimg Customize the image for a particular cloud framework but does not register it. So the user gets the image file. -p/--noldap If this option is active, FutureGrid LDAP will not be configured in the image. This option only works for Cloud registrations. LDAP configuration is needed to run jobs using fg-rain -w/--wait Wait until the image is available in the targeted infrastructure. Currently this is used by Eucalyptus and OpenStack. |
| cloudlist <options> | List images registered in the Cloud infrastructures. Options -e/--euca <SiteName> Select the Eucalyptus Infrastructure located in SiteName (india, sierra...). -n / --nimbus <SiteName> Select the Nimbus Infrastructure located in SiteName (india, sierra...). -o / --opennebula <SiteName> Select the OpenNebula Infrastructure located in SiteName (india, sierra...). -s / --openstack <SiteName> Select the OpenStack Infrastructure located in SiteName (india, sierra...). -v/--varfile <VARFILE> Path of the environment variable files. Currently this is used by Eucalyptus, OpenStack and Nimbus. |
| cloudlistkernels <options> | List kernels available for the Cloud infrastructures. Options -e/--euca <SiteName> Select the Eucalyptus Infrastructure located in SiteName (india, sierra...). -n / --nimbus <SiteName> Select the Nimbus Infrastructure located in SiteName (india, sierra...). -o / --opennebula <SiteName> Select the OpenNebula Infrastructure located in SiteName (india, sierra...). -s / --openstack <SiteName> Select the OpenStack Infrastructure located in SiteName (india, sierra...). |
| hpclist <SiteName> | List images registered in the HPC infrastructure named SiteName (minicluster, india ...). |
| hpclistkernels <SiteName> | List kernels available for HPC infrastructure named SiteName (minicluster, india ...). |
| listsites | List supported sites with their respective HPC and Cloud services. |
| deregister <options> | Deregister an image from the specified infrastructure. Options --deregister <imageId> -x/--xcat <SiteName> Select the HPC infrastructure named SiteName (minicluster, india ...). -e/--euca <SiteName> Select the Eucalyptus Infrastructure located in SiteName (india, sierra...). -n / --nimbus <SiteName> Select the Nimbus Infrastructure located in SiteName (india, sierra...). -o / --opennebula <SiteName> Select the OpenNebula Infrastructure located in SiteName (india, sierra...). -s / --openstack <SiteName> Select the OpenStack Infrastructure located in SiteName (india, sierra...). -v/--varfile <VARFILE> Path of the environment variable files. Currently this is used by Eucalyptus, OpenStack and Nimbus. |
These commands are available when the Rain (rain) contexts is active. To activate the rain context execute use rain. If we execute help, we will see which commands are generic and which ones are specific of this context.
| Command | Description | |
| launch <options> | Provision machines or VMs with the requested OS and execute a job or enter in interactive mode Options -k/--kernel <version> Specify the desired kernel. -i/--image <imgFile> Select the image to register by specifying its location. The image is a tgz file that contains the manifest and image files. -r/--imgid <imgId> Select the image to register by specifying its Id in the repository. -x/--xcat <SiteName> Select the HPC infrastructure named SiteName (minicluster, india ...). -e/--euca <SiteName> Select the Eucalyptus Infrastructure located in SiteName (india, sierra...). -s/--openstack <SiteName> Select the OpenStack Infrastructure located in SiteName (india, sierra...). -n/--nimbus <SiteName> Select the Nimbus Infrastructure located in SiteName (india, sierra...). -o/--opennebula <SiteName> Select the OpenNebula Infrastructure located in SiteName (india, sierra...). -v/--varfile <VARFILE> Path of the environment variable files. Currently this is used by Eucalyptus, OpenStack and Nimbus. -m/--numberofmachines <#instances> Number of machines needed. --volume <size> This creates and attaches a volume of the specified size (in GiB) to each instance. The volume will be mounted in /mnt/. This is supported by Eucalyptus and OpenStack. -t/--instance-type <instancetype> VM Image type to run the instance as. Valid values: [‘m1.small’, ‘m1.large’, ‘m1.xlarge’] -w/--walltime <hours> How long to run (in hours). You may use decimals. This is used for HPC and Nimbus. -j/--jobscript <JOBSCRIPT> Script to execute on the provisioned images. In the case of Cloud environments, the user home directory is mounted in /tmp/N/u/<username>. The /N/u/<username> is only used for ssh between VM and store the ips of the parallel job in a file called /N/u/<username>/machines -I/--interactive Interactive mode. It boots VMs or provisions bare-metal machines. Then, the user is automatically logged into one of the VMs/machines. -b, --background Background mode. It boots VMs or provisions bare-metal machines. Then, it gives you the information you need to know to log in anytime. -w/--wait Wait until the image is available in the targeted infrastructure. Currently this is used by Eucalyptus and OpenStack. |
|
| launchhadoop <options> | Provision machines or VMs with the requested OS, install/configure Hadoop and execute a job or enter in interactive mode. Options Same options that launch. Additional Hadoop Option --inputdir <inputdir> Location of the directory containing the job input data that has to be copied to HDFS. The HDFS directory will have the same name. Thus, if this option is used, the job script has to specify the name of the directory (not to all the path). --outputdir <outputdir> Location of the directory to store the job output data from HDFS. The HDFS directory will have the same name. Thus, if this option is used, the job script has to specify the name of the directory (not to all the path). -hdfsdir <hdfsdir> Location of the HDFS directory to use in the machines. If not provided /tmp/ will be used. |
|
| cloudinstanceslist <options> | List the information of the instance/s submitted to the selected cloud. Options -i/--instance [InstanceId/s] Id of the instance to check status. This is optional, if not provided all instances will be listed. -e/--euca <SiteName> Select the Eucalyptus Infrastructure located in SiteName (india, sierra...). -s/--openstack <SiteName> Select the OpenStack Infrastructure located in SiteName (india, sierra...). -n/--nimbus <SiteName> Select the Nimbus Infrastructure located in SiteName (india, sierra...). -o/--opennebula <SiteName> Select the OpenNebula Infrastructure located in SiteName (india, sierra...). -v/--varfile <VARFILE> Path of the environment variable files. Currently this is used by Eucalyptus, OpenStack and Nimbus. |
|
| hpcjobslist [job/s] | List the information of the HPC job/s. | |
| cloudinstancesterminate <options> | Terminate instance/s from the selected cloud. You can specify a list of instances ids and also reservations ids. Options -i/--instance <InstanceId/s> Id/s of the instance/s or reservation/s to terminate. -e/--euca <SiteName> Select the Eucalyptus Infrastructure located in SiteName (india, sierra...). -s/--openstack <SiteName> Select the OpenStack Infrastructure located in SiteName (india, sierra...). -n/--nimbus <SiteName> Select the Nimbus Infrastructure located in SiteName (india, sierra...). -o/--opennebula <SiteName> Select the OpenNebula Infrastructure located in SiteName (india, sierra...). -v/--varfile <VARFILE> Path of the environment variable files. Currently this is used by Eucalyptus, OpenStack and Nimbus. |
|
| hpcjobsterminate <job/s> | Terminate HPC job/s. |
Context Usage
Show list of available contexts
$ fg-shell -u jdiaz
fg> contexts
The output shows all available contexts
FG Contexts:
------------
repo
image
rain
hadoop
Users can select any of the previous contexts with the use command. Then, the environment of this particular context is initialized.
fg> use repo
fg-repo>
Return to the normal context
fg-repo> use
fg>
Help Usage
List available commands in the generic context
$ fg-shell -u jdiaz
fg> help
The output shows the list of generic commands and the list of commands that are available in each of the contexts. Note that the commands listed for each context are only available when that particular context has been loaded. Some contexts load other contexts as part of their requirements, as we explained before.
A complete manual can be found in https://portal.futuregrid.org/man/fg-shell

Generic Documented commands (type help <topic>):
================================================
contexts  history         load    py    save    setpasswd  use
exec      historysession  manual  quit  script  shortcuts
help      li              pause   run   set     show

Image Repository commands. Execute "use repo" to use them. (type help <topic>):
===============================================================================
get  histimg  histuser  list  modify  put  remove  setpermission  user

Image Management commands. Execute "use image" to use them. (type help <topic>):
================================================================================
cloudlist  cloudlistkernels  generate  hpclist  hpclistkernels  register

FG Dynamic Provisioning commands. Execute "use rain" to use them. (type help <topic>):
======================================================================================
launch  launchhadoop

Please select a CONTEXT by executing use <context_name>
Execute 'contexts' command to see the available context names
List available commands in the image context (this contexts also loads the repo contexts)
fg> use image
fg-image> help
The output is something like this.
A complete manual can be found in https://portal.futuregrid.org/man/fg-shell

General documented commands (type help <topic>):
================================================
contexts  history         load    py    save    setpasswd  use
exec      historysession  manual  quit  script  shortcuts
help      li              pause   run   set     show

Specific documented commands in the repo context (type help <topic>):
=====================================================================
get  histimg  histuser  list  modify  put  remove  setpermission  user

Specific documented commands in the image context (type help <topic>):
======================================================================
cloudlist  cloudlistkernels  generate  hpclist  hpclistkernels  register
General Shell Usage
Session example where we get an image, list all the images which os is centos, add an user and activate it.
$ fg-shell

fg> use repo
fg-repo> get image123123123
fg-repo> list * where os=centos
fg-repo> user -a javi
fg-repo> user -m javi status active
Record the executed commands in an script.
$fg-shell
fg> script myscript.txt
fg> use repo
fg-repo> put /tmp/image.img vmtype=xen & imgtype=opennebula & os=linux & arch=x86_64
fg-repo> list
fg-repo> script end
use repo
put /tmp/image.img vmtype=xen & imgtype=opennebula & os=linux & arch=x86_64
list
Execute shell commands stored in a file. Then exits from the shell
$ cat myscript.txt| fg-shell
Execute shell commands stored in a file from the shell. This stay in the shell.
$ fg-shell -u jdiaz
fg> load myscript.txt
Note
These tools require users to authenticate using their usernames and portal passwords.
In this section you will find information on software deployment details.
You can install the FutureGrid Rain using one of the following procedures.
This option has the following prerequisites:
If you meet these prerequisites, you should be able to install FutureGrid Rain simply by running this as root:
easy_install -U futuregrid
If you are using Ubuntu or Mac OS X, you will likely just need to run this:
sudo easy_install -U futuregrid
If you do not have administrative privileges on your machine, you will have to install FutureGrid Rain under your regular user account:
easy_install -U futuregrid --user
Note
Installing FutureGrid Rain in your home directory will install the FutureGrid Rain commands in ~/.local/bin, which may not be in your PATH environment variable. If not, make sure to update the definition of your PATH environment variable (e.g., in the ~/.profile file if you are using a BASH shell).
Alternatively, you can also request that the commands be installed in a directory that is already in your $PATH. You may want to use ~/bin/, as most Linux distributions will automatically include that directory in your PATH.
easy_install -U futuregrid --user -s ~/bin/
If you do not have Python Distribute, or are unable to install it, you can still install FutureGrid Rain by downloading a source tarball yourself. This tarball contains an installation script that will install and setup Python Distribute, and then proceed to install FutureGrid Rain.
You will first have to download the latest source tarball from the Python Package Index: http://pypi.python.org/pypi/futuregrid
Next, untar the tarball and run the installation script as root:
tar xvzf futuregrid-1.0.1.tar.gz
cd futuregrid-1.0.1
python setup.py install
Note
If you are using Ubuntu or Mac OS X, you will likely just need to run this:
sudo python setup.py install
If you do not have administrative privileges on your machine, you can choose to install everything inside your home directory:
python setup.py install --user
If you want to use the latest version of our code from our GitHub repository, the steps are similar to installing a source tarball. However, instead of downloading a tarball, you will use git to clone our repository on your machine. Simply run the following:
git clone git@github.com:futuregrid/rain.git
This will create a directory called rain. In it, you will find the same setup.py script described in the previous section. If you want to install FutureGrid Rain, and not make any modifications to the code, you should run python setup.py install as described in the previous section.
If you intend to modify the code, and want the FutureGrid Rain commands to use the code in the git repository you’ve created on your machine, you can instead install FutureGrid Rain in “developer” mode:
python setup.py develop
This will install FutureGrid Rain but, instead of copying the Python source code to a system directory, it will create a pointer to the source directory you checked out. That way, any changes you make to the source code will take effect immediately (without having to reinstall FutureGrid Rain).
Take into account that there are, at least, two branches in our GitHub repository: master and dev. The former always contains the latest stable release, including bug fixes, and the former contains the very latest version of our code (which may not work as reliably as the code in the master branch). By default, your repository will track the master branch. To switch to the dev branch, run the following:
git checkout dev
To pull the latest changes from our GitHub repository, run the following:
git pull origin
There are two places where we can locate the configuration files. Our software will look into these places in the following order:
If you have installed FutureGrid Rain using the tarball file (Using a source tarball) you will find the configuration sample files in /etc/futuregrid/. Otherwise, you can download them as a tarball or a ZIP file.
Server Side: The configuration file has to be renamed as fg-server.conf.
Client Side: The configuration file has to be renamed as fg-client.conf.
Note
If you configure several clients or servers in the same machine, the fg-client.conf or fg-server.conf must be the same file.
Note
In the Client Side, the path of the log files must be relative to each users. Using the $HOME directory is a good idea.
The authentication of our software is based on LDAP. So, we need to configure some options in the configuration files to make it possible.
We need to configure the [LDAP] section. This is going to be use by all servers. More information about this section of the server configuration file can be found in LDAP section.
[LDAP]
LDAPHOST= ldap.futuregrid.org
LDAPUSER= uid=rainadmin,ou=People,dc=futuregrid,dc=org
LDAPPASS= passwordrainadmin
log= ~/fg-auth.log
We need to configure the [LDAP] section. This is going to be use by the FutureGrid Shell. This allows the shell to store your encrypted password once it has been validated. In this way, you won’t have to type to password again during that session. More information about this section of the client configuration file can be found in LDAP section.
[LDAP]
LDAPHOST=ldap.futuregrid.org
log=~/fg-auth.log
This server will contain configuration files and kernel files that are needed by the different components of the FutureGrid software.
Setting up an Apache server.
sudo yum install httpd

or

sudo apt-get install apache2

sudo /etc/init.d/httpd start
Copy all configuration files into /var/www/html/ or the directory specified in httpd.conf if you are not using the default options. The configuration files are in the FutureGrid private svn.
In this section we explain how to configure the Image Repository.
In the Server side we need to configure several sections. The main one is the [RepoServer] and we have to create another section with the of the backend system that we want to use (see RepoServer section). Our image repository support different backends that are described in the next table:
Backend option Storage for Image Files Storage for Metadata mysql Posix Filesystem MySQL mongodb MongoDB MongoDB swiftmysql Swift MySQL swiftmmongo Swift MongoDB cumulusmysql Cumulus MySQL cumulusmmongo Cumulus MongoDB
Note
Installation instructions for the software to be used as storage backend can be found in Installing Image Repository Backends
Our predefined option is cumulusmongo. Thus, the [RepoServer] section looks like:
[RepoServer]
port = 56792
proc_max = 10
refresh = 20
nopasswdusers = testuser:127.0.0.1,127.0.0.2; testuser2:127.0.0.1
backend = cumulusmongo
log = ~/reposerver.log
log_level = debug
ca_cert= /etc/futuregrid/certs/imdserver/cacert.pem
certfile= /etc/futuregrid/certs/imdserver/imdscert.pem
keyfile= /etc/futuregrid/certs/imdserver/privkey.pem
restConfFile = /etc/futuregrid/fg-restrepo.conf
Note
You may need to configure the iptables to open the port specified in the port option to allow the communication with the client.
Since we have specified backend = cumulusmongo, we also have to add a section named [cumulusmongo] (see Backend Example Section)
[cumulusmongo]
address = localhost:23000
userAdmin =
configfile =
addressS = 192.168.1.2
userAdminS = PgkhmT23FUv7aRZND7BOW
configfileS = /etc/futuregrid/cumulus.conf
imgStore =/temp/
The imgStore directory is where the images are uploaded to the server via ssh. This is a temporal directory for all the different backends but the mysql one. The permission of this directory must be 777 to allow everyone to upload images. Moreover, when this is used as temporal directory, the bit t must be disabled because the user that executes the server (i.e. imageman) must be able to remove the images from the temporal directory after it has been uploaded to the final destination. By default any directory that you creates has this bit disabled. However, the /tmp directory existing in your system has this bit enabled.
The files specified in the configfile and configfileS options contain the password of the services. These files look like:
[client]
password=complicatedpass
In case we want to use a different configuration, we may need to install the python modules to support that.
MySQL (MySQL has to be installed before you install the python module)
sudo easy_install MySQL-pythonSwift
sudo easy_install python-cloudfiles
Additionally, if we want to configure the Rest Interface Server, we need to specify the option restConfFile in [RepoServer] Section to identify its configuration file. In this configuration file we need to specify the information about the Rest Interface. A simple configuration file is:
[global]
log.error_file = 'cherrypy.error.log'
log.accessfile = 'cherrypy.access.log'
server.socket_host = "0.0.0.0"
server.socket_port = 8443
server.thread_pool = 10
server.ssl_module="builtin"
To enable https, we need to install pyopenssl,
sudo easy_install python-cloudfiles

or

sudo apt-get/yum install python-openssl
have x509 certificates and modify the configuration file:
[global]
log.error_file = 'cherrypy.error.log'
log.accessfile = 'cherrypy.access.log'
server.socket_host = "0.0.0.0"
server.socket_port = 8443
server.thread_pool = 10
server.ssl_module="pyopenssl"
server.ssl_certificate="server.crt"
server.ssl_private_key="server.key"
Once you have the configuration files ready and the backend software installed, you can start the image repository and the rest interface servers by executing IRServer.py and IRRestServer.py respectively.
Note
We recommend to have a system user that run all the servers. In this way it will be easier to manage the sudoers file when necessary.
In the client side, we need to configure the [Repo] section. More information about this section of the client configuration file can be found in Repo section.
[Repo]
port = 56792
serveraddr=localhost
log=~/clientrepo.log
log_level=debug
ca_cert=/opt/futuregrid/futuregrid/etc/imdclient/cacert.pem
certfile=/opt/futuregrid/futuregrid/etc/imdclient/imdccert.pem
keyfile=/opt/futuregrid/futuregrid/etc/imdclient/privkey.pem
Once you have everything set up, you need to create the users in the image repository. Although users are managed in the LDAP server, the image repository also maintain a database with users to control user’s access, quotas, store statistics, etc. This database is also used by the rest of the framework The first user that you create will have the admin role by default. In this way, you can create more users. The command to add an user is:
fg-repo --useradd <userid>
The executable file of this client is fg-repo. More information about how to use the image repository can be found in the Image Repository Manual.
Note
The userid created in the image repository must be the same that in LDAP.
| Server Side (fg-server.conf) | Client Side (fg-client.conf) | |
|---|---|---|
| Access to |
|
|
| Configure |
|
|
| Executables |
|
|
In this section we explain how to configure the Image Generator
In the Server side we need to configure the [GenerateServer] Section (see GenerateServer section).
[GenerateServer]
port = 56791
proc_max = 5
refresh = 20
wait_max = 3600
nopasswdusers = testuser:127.0.0.1,127.0.0.2;testuser2:127.0.0.1
vmfile_centos = 5:/srv/cloud/one/share/examples/centos5_context.one,6:/srv/cloud/one/share/examples/centos6_context.one
vmfile_rhel =
vmfile_ubuntu = /srv/cloud/one/share/examples/ubuntu_context.one
vmfile_debian =
xmlrpcserver = http://localhost:2633/RPC2
bridge = br1
addrnfs = 192.168.1.6
tempdirserver = /srv/scratch/
tempdir = /media/
http_server = http://fg-gravel.futuregrid.edu/
oneuser = oneadmin
onepass = f8377c90fcfd699f0ddbdcb30c2c9183d2d933ea
log = ~/fg-image-generate-server.log
log_level=debug
ca_cert=/opt/futuregrid/futuregrid/etc/imdserver/cacert.pem
certfile=/opt/futuregrid/futuregrid/etc/imdserver/imdscert.pem
keyfile=/opt/futuregrid/futuregrid/etc/imdserver/privkey.pem
Note
You may need to configure the iptables to open the port specified in the port option to allow the communication with the client.
As we described in the Image Generation Section, the Image Generator is supported by a IaaS cloud. Currently, we use OpenNebula for this purpose. Therefore, it is a requirement to have an OpenNebula cloud installed and configured with at least one compute node. Additionally, you need to have the VMs that will be used to generate the images and the templates. The VM templates are specified in the
#---------------------------------------
# VM definition
#---------------------------------------
NAME = "centos5"
CPU    = 1
MEMORY = 1024
OS = [
  arch="x86_64"
  ]
DISK = [
  source   = "/srv/cloud/images/centos-5.6c1.img",
  target   = "hda",
  readonly = "no"
  ]
NIC = [ NETWORK_ID=0]
NIC = [ NETWORK_ID=1]
FEATURES=[ acpi="no" ]
CONTEXT = [
   files = "/srv/cloud/images/centos/init.sh /srv/cloud/images/imageman_key.pub",
   target = "hdc",
   root_pubkey = "imageman_key.pub"
   ]
GRAPHICS = [
  type    = "vnc",
  listen  = "127.0.0.1"
  ]
Configure the scratch directory specified in the tempdirserver option. For that, we need to export via NFS the directory to allow the VMs to mount as scratch disk. Assuming that the tempdirserver option is /srv/scratch and the subnet is 192.168.1.0/24, the configuration steps are:
Install NFS support
sudo apt-get install nfs-common

or

sudo yum install nfs-utils
Create directories
sudo mkdir -p /srv/scratch
sudo chmod 777 /srv/scratch
Export directories. Edit /etc/exports file to insert the following line:
/srv/scratch 192.168.1.*(rw,async,no_subtree_check,no_root_squash) 192.168.1.*(rw,async,no_subtree_check,no_root_squash)
Refresh NFS server
sudo exportfs -r
Configure user that is going to execute the server. Let’s assume that the name of this user is imageman:
Configure ssh to don’t check the host id. This is needed for login into the VMs because the same IP will be associated to different VMs over time. So, we need to edit the $HOME/.ssh/config file to insert the next lines. The permissons of this file is 644.
Host *
      StrictHostKeyChecking no
Edit sudoers file by executing visudo as root user and add the following lines:
imageman ALL=(ALL) NOPASSWD: /usr/bin/python *
imageman ALL=(ALL) NOPASSWD: /usr/sbin/chroot *
imageman ALL=(ALL) NOPASSWD: /bin/mount *
imageman ALL=(ALL) NOPASSWD: /bin/umount *
Configure the Image Repository client because the Image Generation must be able to retrieve and upload images to the repository. See Setting up Image Repository Client. The imageman user must be able to ssh the Image Repository Server machine without introducing password or passphrase. Therefore, we need to put the imageman public key in the authorized_keys of the machine where the Image Repository Server is running.
Once everything is set up you can start the server by execution IMGenerateServer.py as imageman user.
In the client side, we need to configure the [Generation] section. More information about this section of the client configuration file can be found in Repo section.
[Generation]
serveraddr = fg-gravel.futuregrid.edu
port = 56791
log=~/clientgen.log
log_level=debug
ca_cert=/opt/futuregrid/futuregrid/etc/imdclient/cacert.pem
certfile=/opt/futuregrid/futuregrid/etc/imdclient/imdccert.pem
keyfile=/opt/futuregrid/futuregrid/etc/imdclient/privkey.pem
The executable file of this client is fg-generate. More information about how to use the image generation can be found in the Image Generation Manual.
| Server Side (fg-server.conf) | Client Side (fg-client.conf) | |
|---|---|---|
| Access to |
|
|
| Configure |
|
|
| Executables |
|
|
In this section we explain how to configure the Image Registrator for Cloud and HPC infrastructures.
Here we need to configure the [RegisterServerIaas] Section (see RegisterServerIaas section).
[RegisterServerIaas]
port = 56793
proc_max = 5
refresh = 20
nopasswdusers = testuser:127.0.0.1,127.0.0.2;testuser2:127.0.0.1
tempdir = /temp/
http_server=http://fg-gravel.futuregrid.edu/
log = ~/fg-image-register-server-iaas.log
log_level = debug
ca_cert=/opt/futuregrid/futuregrid/etc/imdserver/cacert.pem
certfile=/opt/futuregrid/futuregrid/etc/imdserver/imdscert.pem
keyfile=/opt/futuregrid/futuregrid/etc/imdserver/privkey.pem

[Iaas-india]
description=In this site we support Eucalyptus 2 and OpenStack Cactus. OpenNebula is not deployed in production but you can adapt images for it too.
default_eucalyptus_kernel = 2.6.27.21-0.1-xen
eucalyptus_auth_kernels = 2.6.27.21-0.1-xen:eki-78EF12D2:eri-5BB61255; 2.6.27.21-0.1-xen-test:eki-test:eri-test
default_openstack_kernel = 2.6.28-11-generic
openstack_auth_kernels = 2.6.28-11-generic:aki-00000026:ari-00000027
default_opennebula_kernel = 2.6.35-22-generic
opennebula_auth_kernels = 2.6.35-22-generic: /srv/cloud/images/vmlinuz-2.6.35-22-generic:/srv/cloud/images/initrd-2.6.35-22-generic.img

[Iaas-sierra]
description=In this site we support Eucalyptus 3.
default_eucalyptus_kernel = 2.6.27.21-0.1-xen
eucalyptus_auth_kernels = 2.6.27.21-0.1-xen:eki-623A3895:eri-FC743D05

[Iaas-hotel]
description=In this site we support Nimbus 2.9.
default_nimbus_kernel = 2.6.27.21-0.1-xen
nimbus_auth_kernels = 2.6.27.21-0.1-xen:2.6.27.21-0.1-xen:2.6.27.21-0.1-xen; test1:test1:test1
Configure user that is going to execute the server. Let’s assume that the name of this user is imageman and the tempdir option is /temp/. We need to edit the sudoers file by executing visudo as root user and add the following lines:
Defaults:imageman    !requiretty
User_Alias SOFTWAREG = imageman
Cmnd_Alias IMMANCOMND =
                     /bin/chmod * /temp/*, \
                     /bin/mkdir -p /temp/*, \
                     /bin/mount -o loop /temp/* /temp/*, \
                     /bin/rm [-]* /temp/*, \
                     /bin/sed -i s/enforcing/disabled/g /temp/*, \
                     /bin/tar xvfz /temp/* -C /temp/*, \
                     /bin/umount /temp/*, \
                     /usr/bin/tee -a /temp/*, \
                     /usr/sbin/chroot /temp/*, \
                     /usr/bin/wget * -O /temp/*, \
                     /bin/tar xfz /temp/* --directory /temp/*, \
                     /bin/mv -f /temp/* /temp/*, \
                     /bin/chown root\:root /temp/*

SOFTWAREG ALL = NOPASSWD: IMMANCOMND
Configure the Image Repository client because the Image Generation must be able to retrieve and upload images to the repository. See Setting up Image Repository Client. The imageman user must be able to ssh the Image Repository Server machine without introducing password or passphrase. Therefore, we need to put the imageman public key in the authorized_keys of the machine where the Image Repository Server is running.
Once everything is set up you can start the server by execution IMRegisterServerIaas.py as imageman user.
As we described in the Image Registration Section, the Image Registration for HPC is supported by a xCAT and Moab. Therefore, it is a requirement to have an such software installed in our HPC infrastructure. To interact with xCAT and Moab we have two services called IMRegisterServerXcat.py and IMRegisterServerMoab.py, respectively.
The IMRegisterServerXcat.py will copy the image into the xCAT directories and register the image in the xCAT tables. Our service can run in any machine that has the xCAT client configured and access to the directories /install/netboot/, /tftpboot/ and /etc/xcat. The directories can be mounted via NFS and we only make changes in the first two directories. The last one is needed for xCAT client.
Here we need to configure the [RegisterServerXcat] Section (see RegisterServerXcat section).
[RegisterServerXcat]
xcat_port=56789
xcatNetbootImgPath=/install/netboot/
nopasswdusers = testuser:127.0.0.1,127.0.0.0;testuser:127.0.0.1
http_server=http://fg-gravel.futuregrid.edu/
log=fg-image-register-server-xcat.log
log_level=debug
test_mode=False
default_xcat_kernel_centos = 5:2.6.18-164.el5,6:2.6.32-220.4.2.el6
default_xcat_kernel_ubuntu = karmic:2.6.35-22-generic,lucid:2.6.35-22-generic,maverick:2.6.35-22-generic,natty:2.6.35-22-generic
auth_kernels_centos = 5:2.6.18-164.el5,2.6.18-164.el5-test12; 6:2.6.32-220.4.2.el6, 2.6.32-220.4.2.el6-test
auth_kernels_ubuntu = karmic:2.6.35-22-generic,2.6.35-22-generic-test; lucid:2.6.35-22-generic;maverick:2.6.35-22-generic,2.6.35-22-generic-test12;natty:2.6.35-22-generic
tempdir=/temp/
ca_cert=/opt/futuregrid/futuregrid/etc/imdserver/cacert.pem
certfile=/opt/futuregrid/futuregrid/etc/imdserver/imdscert.pem
keyfile=/opt/futuregrid/futuregrid/etc/imdserver/privkey.pem
max_diskusage=88
protectedimg=rhel6,rhel5.5
Configure user that is going to execute the server. Let’s assume that the name of this user is imageman and the tempdir option is /temp/. We need to edit the sudoers file by executing visudo as root user and add the following lines:
Defaults:imageman    !requiretty
User_Alias SOFTWAREG = imageman
Cmnd_Alias IMMANCOMND = /bin/chmod 600 /install/netboot/*, \
                     /bin/chmod 644 /install/netboot/*, \
                     /bin/chmod 755 /install/netboot/*, \
                     /bin/chmod 777 /install/netboot/*, \
                     /bin/chmod +x /install/netboot/*, \
                     /bin/chmod * /temp/*, \
                     /bin/chown root\:root /install/netboot/*, \
                     /bin/cp /install/netboot/* *, \
                     /bin/cp [-]* /install/netboot/* , \
                     /bin/mkdir -p /install/netboot/*, \
                     /bin/mkdir -p /install/netboot/*, \
                     /bin/mkdir -p /install/netboot/* /install/netboot/*, \
                     /bin/mkdir -p /tftpboot/xcat/*, \
                     /bin/mkdir -p /temp/*, \
                     /bin/mount -o loop /install/netboot/* /install/netboot/*, \
                     /bin/mount -o loop /temp/* /temp/*, \
                     /bin/mount --bind * /install/netboot/*, \
                     /bin/mv -f /install/netboot/* /install/netboot/*, \
                     /bin/mv -f /temp/* /install/netboot/*, \
                     /bin/mv /install/netboot/* /install/netboot/*, \
                     /bin/rm [-]* /install/netboot/*, \
                     /bin/rm [-]* /temp/*, \
                     /bin/sed -i s/enforcing/disabled/g /install/netboot/*, \
                     /bin/sed -i * /install/netboot/*, \
                     /bin/sed -i * /temp/*, \
                     /bin/tar xfz /install/netboot/* -C /install/netboot/*, \
                     /bin/tar xfz /install/netboot/* --directory /install/netboot/*, \
                     /bin/tar xvfz /temp/* -C /temp/*, \
                     /bin/umount /install/netboot/*, \
                     /bin/umount /temp/*, \
                     /usr/bin/tee -a /install/netboot/*, \
                     /usr/bin/tee -a /temp/*, \
                     /usr/bin/tee -a /opt/moab//tools/msm/images.txt, \
                     /usr/bin/wget * -O /install/netboot/*, \
                     /usr/bin/wget * -O /tftpboot/xcat/*, \
                     /usr/sbin/chroot /install/netboot/*, \
                     /usr/sbin/chroot /temp/*, \
                     /usr/bin/wget * -O /temp/*, \
                     /bin/tar xfz /temp/* --directory /temp/*, \
                     /bin/mv -f /temp/* /temp/*, \
                     /bin/chown root\:root /temp/*, \
                     /bin/rm -rf /install/netboot/*, \
                     /bin/rm -rf /tftpboot/xcat/*

SOFTWAREG ALL = NOPASSWD: IMMANCOMND
Configure the Image Repository client because the Image Generation must be able to retrieve and upload images to the repository. See Setting up Image Repository Client. The imageman user must be able to ssh the Image Repository Server machine without introducing password or passphrase. Therefore, we need to put the imageman public key in the authorized_keys of the machine where the Image Repository Server is running.
Once everything is set up you can start the server by execution IMRegisterServerXcat.py as imageman user.
On the other hand, we have the IMRegisterServerMoab.py that register the image in Moab. This server must be running in the same machine where Moab is. In our case, it is running on the Login node. This server is very light as it only modify the /opt/moab/tools/msm/images.txt file and recycle the Moab scheduler.
Here we need to configure the [RegisterServerMoab] Section (see RegisterServerMoab section).
[RegisterServerMoab]
moab_port = 56790
moabInstallPath = /opt/moab/
log = /var/log/fg/fg-image-register-server-moab.log
log_level = debug
ca_cert=/etc/futuregrid/imdserver/cacert.pem
certfile=/etc/futuregrid/imdserver/imdscert.pem
keyfile=/etc/futuregrid/imdserver/privkey.pem
Configure user that is going to execute the server. Let’s assume that the name of this user is imageman. We need to edit the sudoers file by executing visudo as root user and add the following lines:
Defaults:imageman    !requiretty
User_Alias SOFTWAREG = imageman
Cmnd_Alias IMMANCMND = /usr/bin/tee -a /opt/moab/tools/msm/images.txt, \
                       /opt/moab/bin/mschedctl -R, \
                       /bin/sed -i * /opt/moab/tools/msm/images.txt
SOFTWAREG ALL = NOPASSWD: IMMANCOMND
Once everything is set up you can start the server by execution IMRegisterServerMoab.py as imageman user.
In the client side, we need to configure the [Register] section. More information about this section of the client configuration file can be found in Repo section.
[Register]
xcat_port = 56789
moab_port = 56790
iaas_serveraddr = localhost
iaas_port = 56793
tempdir=/tmp/
http_server = http://fg-gravel.futuregrid.edu/
log=~/clientregister.log
log_level=debug
ca_cert=/opt/futuregrid/futuregrid/etc/imdclient/cacert.pem
certfile=/opt/futuregrid/futuregrid/etc/imdclient/imdccert.pem
keyfile=/opt/futuregrid/futuregrid/etc/imdclient/privkey.pem
We also need to configure a section per machine supported. In our case, we support two machines [minicluster] and [india]. In this way, users can specify the machine where they want to register their images.
[Hpc-minicluster]
loginmachine=localhost
moabmachine=localhost
xcatmachine=localhost

[Hpc-india]
loginmachine=<machine_address1>
moabmachine=<machine_address1>
xcatmachine=<machine_address1>
We use the euca2tools to register images in the Eucalyptus and OpenStack cloud infrastructures. Thus, they are required to be available.
The executable file of this client is fg-register. More information about how to use the Image Registration can be found in the Image Registration Manual.
| Server Side Cloud (fg-server.conf) | Server Side HPC (fg-server.conf) | Server Side Moab (fg-server.conf) | Client Side (fg-client.conf) | |
|---|---|---|---|---|
| Access to |
|
|
|
|
| Configure |
|
|
|
|
| Executables |
|
|
|
|
In this section we explain how to configure the Rain.
Rain is currently under development and therefore its functionality is limited. The current functionality allows users to place images onto resources and run their jobs. Hence, it makes use of the image management tools and the infrastructures clients. This means that we need to configure the [Rain] section of the fg-client.conf file and the rest of the image management components. More information about this section of the client configuration file can be found in Rain section.
[Rain]
moab_max_wait = 480
moab_images_file = /opt/moab/tools/msm/images.txt
loginnode = 123.123.123.123
refresh = 20
log=~/clientrain.log
log_level=debug
The executable file of this client is fg-rain. More information about how to use the Rain can be found in the Rain Manual.
| Client Side (fg-client.conf) | |
|---|---|
| Access to |
|
| Configure |
|
| Executables |
|
In this section we explain how to configure the FutureGrid Shell.
The FutureGrid Shell is a client side interface. Therefore, we need to configure the [fg-shell] section of the fg-client.conf file. More information about this section of the client configuration file can be found in fg-shell section.
[fg-shell]
history=~/fgshellhist.txt
log=~/fg-shell.log
log_level=debug
Since this shell is a wrapper for our tools, we need to configure each individual tool before we can use all the advantages of the shell. Moreover, we need to configure the [LDAP] section in the fg-client.conf file.
The executable file of this client is fg-shell. More information about how to use the FutureGrid Shell can be found in the FutureGrid Shell Manual.
| Client Side (fg-client.conf) | |
|---|---|
| Access to |
|
| Configure |
|
| Executables |
|
In this section we are going to explain how to install a single MongoDB service. More information can be found in MongoDB
Note
In MongoDB the databases and tables are created automatically
Note
MongoDB is case sensitive
For all 64-bit RPM-based distributions with yum, create the file /etc/yum.repos.d/10gen.repo and add the following lines:
[10gen]
name=10gen Repository
baseurl=http://downloads-distro.mongodb.org/repo/redhat/os/x86_64
gpgcheck=0
Install MongoDB
sudo yum install mongo-*
Create DB directory
sudo mkdir -p /data/db/
sudo chown `id -u` /data/db     #The owner must be the user that is going to execute mongodb server
Run MongoDB
mongod --port 23000 --dbpath /data/db/ --fork --logpath=/data/db/mongo.log
Rebuild spider monkey
This is only needed if after running MongoDB you get warning message like this:
warning: some regex utf8 things will not work. pcre build doesn't have --enable-unicode-properties
Rebuilding spider monkey from RHEL (Building Spider Monkey).
sudo yum erase xulrunner
sudo yum install curl
curl -O ftp://ftp.mozilla.org/pub/mozilla.org/js/js-1.7.0.tar.gz
tar zxvf js-1.7.0.tar.gz
cd js/src
export CFLAGS="-DJS_C_STRINGS_ARE_UTF8"
make -f Makefile.ref
JS_DIST=/usr make -f Makefile.ref export
Add MongoDB repository to the aptitude soucers file /etc/apt/sources.list.
deb http://downloads.mongodb.org/distros/ubuntu 10.10 10gen
Install MongoDB
sudo apt-key adv --keyserver keyserver.ubuntu.com --recv 7F0CEB10
sudo apt-get update
sudo apt-get install mongodb-stable
Create DB directory
sudo mkdir -p /data/db/
sudo chown `id -u` /data/db
Run MongoDB
mongod --port 23000 --dbpath /data/db/ --fork --logpath=/data/db/mongo.log
Via homebrew (MongoDB OSX)
Install homebrew if you have not yet done
ruby -e "$(curl -fsSLk https://gist.github.com/raw/323731/install_homebrew.rb)"
Install mongodb via homebrew
brew update
brew install mongodb
Create DB directory
sudo mkdir -p /data/db/
sudo chown `id -u` /data/db
Run MongoDB
/usr/local/Cellar/mongodb/1.6.5-x86_64/bin/mongod --port 23000 --dbpath /data/db/ --fork --logpath=/data/db/mongo.log
Work with client by executing mongo localhost:23000 in a different terminal
db.foo.save ( {a:1} )
db.foo.find ()
In case you use macports, replace two first steps with
sudo port install mongodb
In this section we are going to explain how to install and configure Cumulus. More information can be found in Nimbus Project
Check the dependencies from the Cumulus Requirements.
Download and Install the software
wget http://www.nimbusproject.org/downloads/nimbus-iaas-2.9-src.tar.gz

tar vxfz nimbus-iaas-2.9-src.tar.gz
cd nimbus-iaas-2.9-src/cumulus
sudo mkdir /opt/cumulus
sudo chown -R user:user /opt/cumulus
./cumulus-install.sh /opt/cumulus/
mkdir ~/.nimbus
cp /opt/cumulus/etc/cumulus.ini ~/.nimbus
Test the software
cd /opt/cumulus/tests
./run-all.sh
Run service
/opt/cumulus/bin/cumulus &
Create user
/opt/cumulus/bin/cumulus-add-user javi
Output:
ID : eqe0YoRAs2GT1sDvPZKAU
password : S9Ii7QqcCQxDecrezMn6o5frSFvXhThYWmCE4S7nAf
quota : None
canonical_id : 048db304-6b4c-11df-897b-001de0a80259
Note
Remember the ID and password to fill out the fg-server.conf file (the ID will be the userAdminS and the password will be in the file specified in configfileS). More details can be found in Configure Image Repository.
In this section we are going to explain how to install and configure MySQL.
Installing MySQL
apt-get install mysql-client mysql-common mysql-server

or

yum install mysql mysql-server mysql-devel
Login into Mysql
mysql -u root -p
Create User that will manage the image repository databases
CREATE USER 'IRUser'@'localhost' IDENTIFIED BY 'complicatedpass';
Create databases. The name of the database is different depending on the configuration selected in the Image Repository (see Configure Image Repository).
Backend option
Database Name
Command to create the Database
mysql
images
create database images;
swiftmysql
imagesS
create database imagesS;
cumulusmysql
imagesC
create database imagesC;
Create the tables for the selected database. This example is with the images databases. You will need to do the same with the others if you plan to use these storage configurations.
Select the database to be used
use images;
Create tables
create table meta ( imgId varchar(100) primary key, os varchar(100), arch varchar(100), owner varchar(100), description varchar(200),
    tag varchar(200), vmType  varchar(100), imgType varchar(100), permission varchar(100), imgStatus varchar(100) );

create table data ( imgId varchar(100) primary key, imgMetaData varchar(100), imgUri varchar(200), createdDate datetime, lastAccess datetime,
     accessCount long, size long, extension varchar (50), FOREIGN KEY (imgMetaData) REFERENCES meta(imgId) ON UPDATE CASCADE ON DELETE CASCADE );

create table users (userId varchar(100) primary key, cred varchar(200), fsCap long, fsUsed long, lastLogin datetime, status varchar(100),
     role varchar(100), ownedimgs long);
Give all permission to the user created
GRANT ALL PRIVILEGES ON images.* TO 'IRUser' IDENTIFIED BY 'userpassword';
Note
Remember the userId (IRUser) and password (userpassword) to fill out the fg-server.conf file (the userId will be the userAdmin and the password will be in the file specified in configfile). More details can be found in Configure Image Repository.
OpenStack provides some manuals to explain how to deploy Swift.
Notes for RHEL 5
Install Python 2.6
sudo rpm -Uvh http://yum.chrislea.com/centos/5/i386/chl-release-5-3.noarch.rpm
sudo rpm --import /etc/pki/rpm-gpg/RPM-GPG-KEY-CHL
sudo yum install python26
sudo yum install python26-devel

or

sudo wget ftp://ftp.univie.ac.at/systems/linux/fedora/epel/5/i386/epel-release-5-4.noarch.rpm
sudo rpm -Uvh epel-release-5-4.noarch.rpm
sudo yum install python26
sudo yum install python26-devel
Setuptools
yum install python26-distribute
Install python modules
easy_install-2.6 netifaces eventlet setuptools virtualenv paste PasteDeploy webob pysqlite uuid xattr repoze.what configobj coverage formencode
netifaces nose paramiko paste pastedeploy pastescript scgi
Install sqlite3
wget http://dl.atrpms.net/el5-x86_64/atrpms/testing/sqlite-3.6.20-1.el5.x86_64.rpm
wget http://dl.atrpms.net/el5-x86_64/atrpms/testing/sqlite-devel-3.6.20-1.el5.x86_64.rpm
rpm -Uvh sqlite-3.6.20-1.el5.x86_64.rpm sqlite-devel-3.6.20-1.el5.x86_64.rpm
Differences with the Swift manuals for the “Storage nodes”
Step 4. /etc/xinetd.d/rsync to enable it
Step 5. service xinetd restart
Iptable config (/etc/sysconfig/iptalbes). Add this:
-A RH-Firewall-1-INPUT -p udp -m udp --dport 6000 -j ACCEPT
-A RH-Firewall-1-INPUT -p tcp -m tcp --dport 6000 -j ACCEPT
-A RH-Firewall-1-INPUT -p udp -m udp --dport 6001 -j ACCEPT
-A RH-Firewall-1-INPUT -p tcp -m tcp --dport 6001 -j ACCEPT
-A RH-Firewall-1-INPUT -p udp -m udp --dport 6002 -j ACCEPT
-A RH-Firewall-1-INPUT -p tcp -m tcp --dport 6002 -j ACCEPT
If you don’t have another partition, you can create a file. In this case we don’t have xfs support, so we use ext3
dd if=/dev/zero of=/srv/swift-disk bs=1024 count=0 seek=20000000
mkfs.ext3 /srv/swift-disk
Edit /etc/fstab and add
/srv/swift-disk /srv/node/sdb1 ext3 loop,noatime,user_xattr 0 0
Mount it
mount /srv/swift-disk
Note
Remember the userId:usergroup and password to fill out the fg-server.conf file (the userId:usergroup will be the userAdminS and the password will be in the file specified in configfileS). More details can be found in Configure Image Repository. Swift users are defined in the file /etc/swift/proxy-server.conf.
This section is used to configure the access to LDAP to verify the user passwords.
This section is required by all services
Type: String
Required: Yes
Hostname or IP address of the LDAP server that manages the user’s authentication.
Type: user-dn
Required: Yes
This is the DN of an user that have read access to the encrypted passwords of every user. This looks like uid=USER,ou=People,dc=futuregrid,dc=org
Valid values: True, False
Required: No
This option is for development purposes. For security reasons, the LDAP server cannot be contacted from outside of FutureGrid network. Therefore, we need this option to go test our services before we deploy them on production.
This section is used to configure the Image Repository Server. To complete the configuration of this service we need to configure also a :ref:Repository Backend <repo_backend_example> section.
Type: Integer
Required: Yes
Maximum number of request that can be processed at the same time.
Type: Integer
Required: Yes
Interval to check the status of the running requests when proc_max is reached and determine if new request can be processed.
Type: String-list (comma separated)
Required: No
List of users (separated by commas) that can use the Image Repository in behalf of other users. This could be useful for other FutureGrid services that need to call the repository in behalf of an user. This also prevents that other users can hack the client to use the repository as if they were other users.
Type: Dictionary-list (semicolon separated)
Required: No
Users listed here does need to introduce their password when using the Image Repository. Each user will be associated to one or several IP address. The format is userid:ip,ip1; userid1:ip2,ip3.
Valid values: mongodb, mysql, swiftmysql, swiftmongo, cumulusmysql, cumulusmongo
Required: Yes
Specify the desired storage backend (see Image Repository Backend Table for more details). The value specified in this option will be the name of a section that has the configuration. See Backend example below.
Valid values: debug, error, warning, info
Required: No
Desired log level. The default option is debug.
Type: ca-cert
Required: Yes
Location of CA certificate (PEM-encoded) used to generate user and service certificates.
Type: service-cert
Required: Yes
Location of the certificate (PEM-encoded) used by the Image Repository.
Type: key-cert
Required: Yes
Location of the private key (PEM-encoded) of the certificate specified in certfile.
Type: file-path
Required: No
Location of the configuration file for the Image Repository Rest Interface.
This sections is an example of a backend configurations.
Type: String
Required: Yes
Address of the server where MongoDB or MySQL are listening. In the case of MongoDB we can use a list of address:ports separated by commas. In MySQL we only specify the address of the server.
Type: String
Required: Yes
User that is going to access MongoDB or MySQL to store/retrieve the data. Although the option is required, it can be with no value.
Type: file-path
Required: Yes
Location of the file that contains the password of the user specified in userAdmin. Although the option is required, it can be with no value.
Type: String
Required: Yes
Address of the server where the complementary service is listening. Currently, this complementary service can be Cumulus or Swift. In both cases we only specify the address of the server.
Type: String
Required: Yes
User that is going to access the complementary service (Cumulus or Swift) to store/retrieve the data. In the case of Swift, the user is typically <user-name>:<group-name>.
Type: file-path
Required: Yes
Location of the file that contains the password of the user specified in userAdminS.
Type: directory-path
Required: Yes
Location of the directory where images are uploaded to the server. This is a temporal directory in all cases but MySQL. When this is a temporal directory the permission must be 777 without the t bit, because the user that is running the server must be able to remove the images once they are stored in the final destination. This bit is disable by default when you create a directory. However the /tmp/ directory has this bit enabled.
This section is used to configure the Image Generation Server.
Type: Integer
Required: Yes
Maximum number of request that can be processed at the same time.
Type: Integer
Required: Yes
Interval to check the status of the running requests when proc_max is reached and determine if new request can be processed.
Type: Integer
Required: Yes
Maximum time that the service will wait for an image to boot, that is, the time from penn status to the runn one. If the time is exceeded, the VM is killed and the Image Generation request fails.
Type: Dictionary-list (semicolon separated)
Required: No
Users listed here does need to introduce their password when using the Image Generation. Each user will be associated to one or several IP address. The format is userid:ip,ip1; userid1:ip2,ip3.
Type: String
Required: Yes
Location of the OpenNebula VM templates that boots the VMs where the image requested by the user will be generated. Currently, four OSes are considered: centos, rhel, ubuntu and debian. Therefore, we will have four options named vmfile_centos, vmfile_rhel, vmfile_ubuntu, vmfile_debian. However, only centos and ubuntu are implemented. The other options have to be there but we do not need to specify any value until they are implemented. In the case of CentOS, the value is a list of <version>:<template-file-location> separated by commas because CentOS 5 is not compatible with CentOS 6.
Type: URL
Required: Yes
Address of the OpenNebula service. It should be something like http://localhost:2633/RPC2
Type: String
Required: Yes
Bridge where the VM network interface will be attached. This is used to identify the IP that OpenNebula has assigned to the VM.
Type: String
Required: Yes
Address of the machine that shares the directory tempdirserver. This address must be in the same network that the VM address.
Type: String
Required: Yes
Location of the directory shared with the VMs. This directory will be used as scratch partition for the Vms. In this way, the VM disks can be small and we don’t need to transfer the image back to the server. Users must be able to read the files in this directory to retrieve their images when needed.
Type: String
Required: Yes
Location of the tempdirserver directory inside the VM when it is mounted via NFS.
Type: URL
Required: Yes
Address of the http server that keeps configuration files needed to generate the images. Thus, the VMs has to have access to this http server.
Type: URL
Required: Yes
User that will manage the VMs for the Image Generation server. It could be oneadmin directly or a user created for this purpose.
Type: URL
Required: Yes
Password of the user specified in oneuser. You get that password by executing oneuser list as oneadmin user.
Valid values: debug, error, warning, info
Required: No
Desired log level. The default option is debug.
Type: ca-cert
Required: Yes
Location of CA certificate (PEM-encoded) used to generate user and service certificates.
Type: service-cert
Required: Yes
Location of the certificate (PEM-encoded) used by the Image Generation server.
Type: key-cert
Required: Yes
Location of the private key (PEM-encoded) of the certificate specified in certfile.
This section is used to configure the Image Registration xCAT Server for HPC infrastructures.
Type: Integer
Required: Yes
Port where the Image Registration xCAT server will be listening.
Type: String
Required: Yes
Location of the directory used by xCAT to store the netboot images. Typically, this is /install/netboot
Type: Dictionary-list (semicolon separated)
Required: No
Users listed here does need to introduce their password when using the Image Registration xCAT. Each user will be associated to one or several IP address. The format is userid:ip,ip1; userid1:ip2,ip3.
Type: URL
Required: Yes
Address of the http server that keeps configuration files needed to adapt the images and get the kernel files.
Valid values: debug, error, warning, info
Required: No
Desired log level. The default option is debug.
Valid values: True,``False``
Required: No
This option is for testing the service in a machine without xCAT. The default value is False.
Type: Dictionary-List (comma separated)
Required: Yes
Default kernel name for each supported OS. The syntax is a list of <os_version>:<kernel_version> separated by commas. Currently, two OSes are considered: centos and ubuntu. Therefore, we will have two options named default_xcat_kernel_centos and default_xcat_kernel_ubuntu
Type: Dictionary-list (semicolon separated)
Required: Yes
Authorized kernels for each supported OS. The syntax is <os_version>:<kernel1>,<kernel2>; <os_version2>:<kernel3>,<kernel4>. Currently, two OSes are considered: centos and ubuntu. Therefore, we will have two options named auth_kernels_centos and auth_kernels_ubuntu.
Type: String
Required: Yes
Location of the scratch directory used to extract the image and read the manifest. Then, the image is moved to the real directory using the manifest information.
Type: ca-cert
Required: Yes
Location of CA certificate (PEM-encoded) used to generate user and service certificates.
Type: service-cert
Required: Yes
Location of the certificate (PEM-encoded) used by the Image Registration server.
Type: key-cert
Required: Yes
Location of the private key (PEM-encoded) of the certificate specified in certfile.
Type: Integer (percentage)
Required: Yes
Maximum usage of the partition where the xcatNetbootImgPath is located. This is specified in percentage. If the usage is higher than this value, we do not allow to register more images.
Type: List (comma separated)
Required: No
The images listed here cannot be removed.
This section is used to configure the Image Registration Moab Server for HPC infrastructures.
Type: Integer
Required: Yes
Port where the Image Registration Moab server will be listening.
Type: String
Required: Yes
Location where Moab is installed. For example /opt/moab/
Valid values: debug, error, warning, info
Required: No
Desired log level. The default option is debug.
Type: ca-cert
Required: Yes
Location of CA certificate (PEM-encoded) used to generate user and service certificates.
Type: service-cert
Required: Yes
Location of the certificate (PEM-encoded) used by the Image Registration server.
Type: key-cert
Required: Yes
Location of the private key (PEM-encoded) of the certificate specified in certfile.
This section is used to configure the Image Registration Server for Cloud infrastructures.
Type: Integer
Required: Yes
Port where the Image Registration IaaS server will be listening.
Type: Integer
Required: Yes
Maximum number of request that can be processed at the same time.
Type: Integer
Required: Yes
Interval to check the status of the running requests when proc_max is reached and determine if new request can be processed.
Type: Dictionary-list (semicolon separated)
Required: No
Users listed here does need to introduce their password when using the Image Registration IaaS. Each user will be associated to one or several IP address. The format is userid:ip,ip1; userid1:ip2,ip3.
Type: String
Required: Yes
Location of the scratch directory where images are copied and modified. The permisson has to be 777 with the t bit disabled to allow the user that executes the server remove the original image. This bit is disable by default when you create a directory. However the /tmp/ directory has this bit enabled.
Valid values: debug, error, warning, info
Required: No
Desired log level. The default option is debug.
Type: ca-cert
Required: Yes
Location of CA certificate (PEM-encoded) used to generate user and service certificates.
Type: service-cert
Required: Yes
Location of the certificate (PEM-encoded) used by the Image Registration server.
Type: key-cert
Required: Yes
Location of the private key (PEM-encoded) of the certificate specified in certfile.
This section contains information about the kernels used to register an image for each supported infrastructure. Since the kernel is an essential part, only the infrastructures listed here are available in each site. FutureGrid sites are india, sierra, hotel.
Type: String
Required: Yes
Default kernel that will be used when registering an image in such infrastructure. <infrastructure-name> can be eucalyptus, openstack, nimbus and opennebula. Therefore, we will have two options named default_eucalyptus_kernel, default_openstack_kernel, default_nimbus_kernel and default_opennebula_kernel.
Type: List (semicolon separated)
Required: Yes
Authorized kernels for registering an image in such infrastructure. <infrastructure-name> can be eucalyptus, openstack, nimbus and opennebula. Therefore, we will have two options named eucalyptus_auth_kernels, openstack_auth_kernels, nimbus_auth_kernels and opennebula_auth_kernels. The syntax is eucalyptus_auth_kernels = <kernel1>:eki:eri;<kernel2>:eki:eri. Nimbus uses the name to identify the kernel, but we keep the syntax just in case they change in the future. OpenNebula does not have ids for now and we have to use the location of the files.
This section is used to configure the FutureGrid Shell.
Type: history-file
Required: Yes
Location of the file where the executed commands are stored.
Valid values: debug,``error``,``warning``,``info``
Required: No
Desired log level. The default option is debug.
Type: file
Required: Yes
Location of the default file where the commands executed are recorded after we active the script command in the shell. More information about how to use the FutureGrid Shell can be found in FutureGrid Shell Manual.
This section is required only by the FutureGrid Shell
Type: String
Required: Yes
Hostname or IP address of the LDAP server that manages the user’s authentication.
Valid values: True, False
Required: No
This option is for development purposes. For security reasons, the LDAP server cannot be contacted from outside of FutureGrid network. Therefore, we need this option to go test our services before we deploy them on production.
This section is used to configure the Image Repository client.
Type: String
Required: Yes
Address of the machine where the Image Repository server is running.
Valid values: debug, error, warning, info
Required: No
Desired log level. The default option is debug.
Type: ca-cert
Required: Yes
Location of CA certificate (PEM-encoded) used to generate user and service certificates.
Type: service-cert
Required: Yes
Location of the certificate (PEM-encoded) used by the Image Repository client.
Type: key-cert
Required: Yes
Location of the private key (PEM-encoded) of the certificate specified in certfile.
This section is used to configure the Image Generation client.
Type: String
Required: Yes
Address of the machine where the Image Generation server is running.
Valid values: debug, error, warning, info
Required: No
Desired log level. The default option is debug.
Type: ca-cert
Required: Yes
Location of CA certificate (PEM-encoded) used to generate user and service certificates.
Type: service-cert
Required: Yes
Location of the certificate (PEM-encoded) used by the Image Generation client.
Type: key-cert
Required: Yes
Location of the private key (PEM-encoded) of the certificate specified in certfile.
This section is used to configure the Image Registration client. To complete the configuration of this service we need to configure also the :ref:Machines <fg-client_machines> sections.
Type: Integer
Required: Yes
Port where the Image Registration xCAT server will be listening.
Type: Integer
Required: Yes
Port where the Image Registration Moab server will be listening.
Type: String
Required: Yes
Address of the machine where the Image Registration server for Cloud is running.
Type: Integer
Required: Yes
Port where the Image Registration xCAT server will be listening.
Type: String
Required: No
Location of the scratch directory to extract images when --justregister option is used. If this option is not provided the current directory will be used.
Type: URL
Required: Yes
Address of the http server that keeps configuration files.
Valid values: debug, error, warning, info
Required: No
Desired log level. The default option is debug.
Type: ca-cert
Required: Yes
Location of CA certificate (PEM-encoded) used to generate user and service certificates.
Type: service-cert
Required: Yes
Location of the certificate (PEM-encoded) used by the Image Repository client.
Type: key-cert
Required: Yes
Location of the private key (PEM-encoded) of the certificate specified in certfile.
This section specify that this site has our software for dynamic provisioning images on baremetal.
Type: String
Required: Yes
Address of the machine where Moab is installed and therefore the IMRegisterServerMoab.py is running.
Type: String
Required: Yes
Address of the machine where machine is installed and therefore the IMRegisterServerXcat.py is running.
Type: Integer
Required: Yes
Maximum time that we wait for a image registered on Moab to became available.
Type: String
Required: Yes
Location of the file where Moab stores the list of images. If the image requested is not there, we do not wait.
Type: IP address
Required: Yes
IP of the login node. This is used to mound the home directory of the user inside the VM via sshfs.
Type: URL
Required: Yes
Address of the http server that keeps configuration files.
Valid values: debug, error, warning, info
Required: No
Desired log level. The default option is debug.
Type: log-file
Required: Yes
Location of the file where the error logs will be stored.
Type: log-file
Required: Yes
Location of the file where the access logs will be stored.
Type: ssl-cert
Required: No
Location of the certificate used for https. If this option is not provided the protocol will be http.
Type: log-file
Required: Yes
Location of the certificate key for the certificate specified in server.ssl_certificate. If this option is not provided the protocol will be http.
The software packages on the FutureGrid machines is manage using the Environment Modules. The Environment Modules package provides for the dynamic modification of a user’s environment via modulefiles.
In this section, we explain how to create a module for our software.
Create a directory to place the software /N/soft/futuregrid-1.0/.
Locate the directory where Modules is installed. In the case of India, this is installed in /opt/Modules/. From now on we will refer to this location as $MODULES_PATH.
Create a directory in $MODULES_PATH/default/modulefiles/tools/futuregrid
In this directory we need to create a file with the version number. In this example the file is named 1.0. The content of this file is some information about the software location and the list of modules that need to be loaded as requirements.
#%Module1.0#########################################################

set ver 1.0
set path /N/soft/futuregrid-$ver

proc ModulesHelp { } {
puts stderr "This module adds the FutureGrid toolkit to your environment"
}

module-whatis "Configures your environment for the FutureGrid toolkit"

prepend-path PATH $path
prepend-path PATH $path/bin/

if [ module-info mode load ] {
puts stderr "futuregrid version $ver loaded"
}

if [ module-info mode switch2 ] {
puts stderr "futuregrid version $ver loaded"
}

if [ module-info mode remove ] {
puts stderr "futuregrid version $ver unloaded"
}

module load euca2ools
module load python_w-cmd2
module load moab
module load torque
Note
If the python is not the one installed in the system, the binaries may be inside your python directory.
The documentation has been created using Sphinx and therefore you have to build it before you can see the final html files. The source files of the documentation can be found under the doc directory of our software package. Next, we define the needed steps to build the documentation.
Install the documentation Using a source tarball or Downloading the latest code from GitHub.
Change your current directory to the doc one.
cd doc
Build the documentation using the Makefile.
make website
The documentation should be in the directory build/web-<version>/. This basically contains html files that can be copied to a regular http server.
In this section you will find information on lower level programming details.
In this section we explain how to develop a new module for the FutureGrid Shell. More information can be found in the FutureGrid Shell Manual.
Download the FutureGrid code:
git clone git@github.com:futuregrid/rain.git
Create a branch
git checkout -b <branch_name>
Install in developer mode:
sudo python setup.py develop
Copy configuration files from etc directory to /etc/futuregrid or to ~/.fg/ and set them up (:ref:admin)
Next, we explain the steps needed to include a new module in the FutureGrid shell. As an example, we use the repository module, called “repo”
Create a file to develop your functionality. This file will be called fgShellRepo.py and will be located in src/futuregrid/shell/ (change Repo with your module name). The file includes a class with the same name that inherits from cmd2. See the fgShellRepo.py file for more details.
Add your methods that has to be like “do_<module><method>” i.e. do_repoget. In this way, in the shell we will have a command called repoget. You can also include a method called help_repoget that show information when execute “help repoget” in the shell.
Note
These methods will not have functionality. They only are a new command line interface for your existing methods. In the repository example, the functionality is in the class IRServiceProxy.
Go to file fgCLI.py and make the fgShell class to inherit from your class. For that you have to do three steps
Import your class.
from futuregrid.shell.fgShellRepo import fgShellRepo
Add it to the fgShell class.
classfgShell(Cmd,
             fgShellUtils,
             fgShellRepo):
We have the list of available commands in a set called self.env to determine the available contexts (each module will have a context, see section Contexts). Here you have to add the name of your context as a string. This variable is in the constructor of the class fgShell (__init__(...)) and looks like:
self.env=["repo","rain",""]
In the constructor we also have to write some information about the module.
self.text = {'repo': 'Image Repository,
             'rain': 'FG Dynamic Provisioning'}
Next, we have to specify the modules that are required for the new. In this way, we only initialize the components that the user needs. This is done in the do_use method (see next section Contexts) of the fgCLI.py file. Thus, we need to add a condition and a list of requirements that the new module has. Note that the requirements strings MUST be as in the name of the classes that usually have the first character in uppercase.
if (arg=="repo"):
   requirements=["Repo"]
elif (arg == "rain"):
   requirements=["Repo","Image","Rain"]
Attention to the arguments of your methods. No matter how many arguments you have, all them are sent in a unique string. Then, in your method you have to get them by using the “getArgs(in: string): list” method, that is in the fgShellUtils class.
In your class (fgShellRepo in this example) you will have an __init__ method to initialize your module. However, it will be called only if you change to your module’s context, see next Section.
We have created contexts make easier the use of the FutureGrid commands by removing the prefix of your module. For that we have the show and use command. The show command list the available contexts and the use command change to a particular context. In this way, we can change to the repo context by executing “use repo”. Note that the prompt change from “fg>” to “fg-repo>” Now, the get command point to the repoget command.
We have already done several steps focused to enable the context. Here, we explain some other optional steps, but highly recommendable. All this is done in the fgShellUtils.py file.
If your have a command that is already in this class, you do not need to add anything to it.
If your command is not in this class, you can add it by creating a method. For example, let assume that you have a hello method.
def do_hello(self, args):
    """
    Generic get command that changes its behavior depending on the
    context specified with use command.
    """
    if(self._use != ""):
        found = False
        for i in self._requirements:
            prefix=string.lower(i)
            command = "self.do_" + prefix + "hello(\"" + args + "\")"
            try:
                eval(command)
                found = True
                break
            except AttributeError:
                pass
        if not found:
            print "There is no hello method in any of the active contexts (" + str(self.requirements) + " )"
            self._log.error(str(sys.exc_info()))
    else:
        self.generic_error()

help_hello = generic_help
This code will call a different method depending of the context. If your context is “repo”, you need to have a method called do_repohello(args) in your fgShellRepo class.
We have created a log file system to be use in the Shell. To use it, you only need to import the fgLog.py file:
from futuregrid.utils import fgLog Then you can write in the logs using any of this methods:
fgLog.degug(“text”)
fgLog.error(“text”)
fgLog.warning(“text”)
fgLog.info(“text”)
The log file will be store in log file specified in the “fg-shell” section of the fg-client.conf configuration file. This file is placed in /etc/futuregrid/ or in ~/.fg/
After you have created your new module, you need to push your branch into github and request to merge it with the official dev branch.
Upload new branch to github
git push origin <branch_name>
Send us a message via github to merge the code
Changes:
Known problems:
Summary of the main functionality provided for this version:
The latest version of the FutureGrid Rain is 1.0.1
The recommended way of installing Rain is using easy_install. You can find instructions on how to do this in the Installation chapter of the documentation.
If you do need to download Rain as an installable Python Egg or as a source tarball, both are available for download in the Python Package Index: http://pypi.python.org/pypi/futuregrid
The sample configuration files shown in the documentation are available for download as a tarball or a ZIP file.
If you want to use the latest development version of Rain, you can track our GitHub repository.
The Installation chapter of the documentation provides instructions on how to check out our code from GitHub.
If you run into problems when using FutureGrid Rain and Image Management, please use our help form at https://portal.futuregrid.org/help
Depending of the configuration of your machines, you may have problems installing some python modules. In particular, we have notice problems with the ldap modules, which is required for the installation of our software.
Installing python-ldap
Ldap api
sudo apt-get install python-ldap
or
sudo yum install python-ldap
or
sudo yum install python26-ldap  #(when the default python is the 2.4 version)
Load FutureGrid module on India.
FutureGrid module loads the appropriated python module. Therefore, if you have previously loaded a python module, you need to unload it. Then load futuregrid module again.
The error looks like:
[jdiaz@i136 ~]$ module load futuregrid
futuregrid version 1.1 loaded
euca2ools version 2.0.2 loaded
python_w-cmd2/2.7(21):ERROR:150: Module 'python_w-cmd2/2.7' conflicts with the currently loaded module(s) 'python/2.7'
python_w-cmd2/2.7(21):ERROR:102: Tcl command execution failed: conflict python

moab version 5.4.0 loaded
torque/2.5.5 version 2.5.5 loaded
[jdiaz@i136 ~]$
The solution is:
[jdiaz@i136 ~]$ module unload python/2.7
[jdiaz@i136 ~]$ module load futuregrid